
Recently, a friend shared a photo of a braided look with a woven ribbon. It was a beautiful concept, but as a professional stylist, I immediately thought: I can do this better! I upgraded the technique, tried it out on my friend, and the results were absolutely stunning. Now, I’ve recreated this romantic hairstyle exclusively for our readers.
Welcome to HairstyleCamp Originals—a brand new series where we share exclusive, original hair tutorials created entirely in-house by the HairstyleCamp team.
Today, we bring you a romantic double-Dutch braided updo tutorial that you can wear to a spring wedding, a garden party, an engagement dinner, or any special event.
From the front, this style stays soft and clean. Turn around, and it opens up into two voluminous Dutch braids, a twisted low bun, and a leafy ribbon that winds beautifully through the back.
This look follows a specific sequence that makes it manageable to recreate at home: braid both sides, join them at the nape, open the braids up, thread in the ribbon and twist the remaining length over a hidden donut sponge. Let’s break it down!
Tutorial
Dutch Braided Updo
 Before
 After
After
Romantic Double-Dutch Braided Low Bun Tutorial
What You’ll Need
- Hair brush: Make sure every knot is out before you start parting. A snag halfway through a Dutch braid will throw off the whole section.
- Small rubber bands or clear elastics: These are just for parking each braid tail until the center tie is in place.
- Leafy ribbon or vine-style satin trim: This is what gives the finished bun that garden-party detail and carries texture all the way down the back.
- Bobby pins: You need them for two jobs here—pinning the donut sponge flat and hiding any ribbon ends that want to pop up.
- Hairspray: Enough to set the style, not so much that the braids go crunchy.
- Donut sponge: Not for a ponytail-through sock bun; use it as a hidden cushion so the low bun looks full and stays anchored.
- Helpful extras: Keep a sectioning clip and a tail comb nearby, too. They are not glamorous, but they keep the part sharp and the spare side out of the way.

Hair Prep: Give the Braid Something to Hold On To
Start on dry hair. If your hair feels glassy in your fingers and braids usually loosen on you, add a light bit of grip before you begin. If your hair already has some texture, leave it alone and keep the finish softer. Either way, make the center part clean from hairline to nape, because the symmetry in the back depends on that line being right.
If you want those little face-framing pieces, leave them out now. Don’t wait until the bun is pinned and sprayed—pulling them loose later can make the hairline look messy.

Pancaking is not optional — it is what makes the style look full and soft instead of narrow and tight. Once the braids are joined at the nape, slow down and open them up crown to nape, side to side. Don’t rush past this step. The whole back depends on it.
Build the Braided Crown
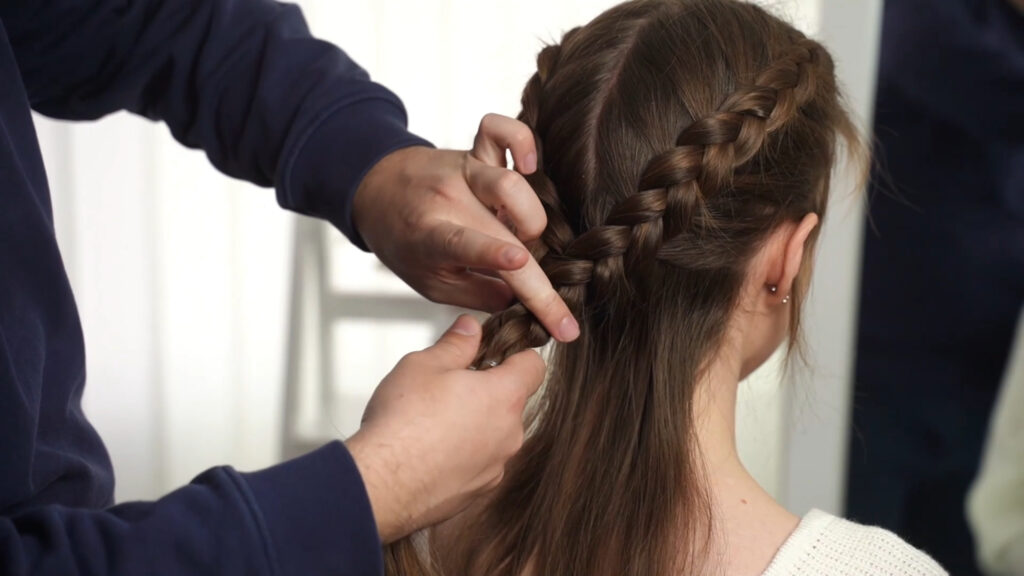
Part the hair in half and clip one side away. On the side you’re working on, take a small section near the front hairline and split it into three even pieces. Start the braid Dutch-style, which means the outside strands go under the center instead of over it. Every time you come back to the outside sections, feed in a little more hair.
Keep those add-in sections small. Big scoops make the braid swell in one place and flatten in another, and you don’t really notice it until the back is finished.


Once you reach the bottom of the head, stop adding hair—and do not braid all the way to the ends. You need that loose length later. Secure the first braid temporarily with a sectioning clip so it stays out of your way, and repeat the same braid on the second side.
Check the distance from each braid to the center part before you move on. If one side sits closer to the part, the finished bun can still be beautiful, but the style won’t read as balanced from the back.
Lock the Shape at the Nape
Bring both braid tails together at the nape and secure them with one elastic. That single tie is the point where the style starts behaving.
Now slow down and open the braids. In salon language, this is called pancaking. Pinch the outside edge of a loop, tug a little, then move to the matching spot on the other side. Don’t yank one braid all at once or it will balloon wider than the other. Go crown to nape, side to side, until the braids look soft and even.

Common mistake to avoid: don’t thread the ribbon through before you’ve opened the braid. If the braid is still tight, you’ll fight the ribbon, then distort the shape when you try to soften it later.
Thread the Ribbon, Then Twist the Tail
Once the braids are opened up, start the leafy ribbon near the crown and guide it through the braid loops so it follows the line of the braid toward the bun. Don’t force a perfect, mechanical pattern here. Let it travel in a way that looks natural. That softer path is what makes the finished style feel expensive instead of crafty.
Leave the ribbon tail hanging with the rest of the loose hair. Now remove the small elastics from the ends of the individual braids—you don’t need that extra bulk anymore because the center elastic is holding the structure in place.
Split the remaining hair into two sections. Add the ribbon tail into one of them. Twist both sections in the same direction, then wrap them around each other in the opposite direction to build a rope braid. Keep that rope a little loose in your hands. A rope braid that is too neat and tight will look skinny once it’s wrapped over the sponge.


If the ribbon wants to wander, anchor it where the braid begins or where the bun starts. Those are the easiest spots to hide a pin.
Once you reach the bottom, secure the end of the rope twist with a clear mini elastic.
Build the Low Bun Over a Hidden Cushion
This is the part you never want to misunderstand: the donut sponge is not being used the way you’d use it for a classic sock bun. Pin it flat against the head at the low base so it acts like a hidden cushion.
Wrap the rope braid over that cushion, spreading the twist wherever you need extra coverage. Tuck the tail under, pin, step back, and check the shape. Then pin again. If the bun looks too narrow, don’t start over—ease the rope open a little with your fingers before you secure the last turn.


Finishing Touch
Once the shape is exactly where you want it, mist hairspray around the braids and bun instead of soaking the whole head. Then check the front. If you left out two face-framing pieces, curl them now for a softer result. Keep those curls airy. A tight ringlet next to a loose braided bun never looks like the same hairstyle.
What makes this updo so great is that it stays soft without collapsing. The Dutch braids keep the shape clean through the crown, the rope-wrapped bun gives you fullness at the nape, and the leafy ribbon is what makes it feel finished instead of just pinned up.
Once everything is set with a light mist of hairspray, this is the kind of style you can trust for a long event, outdoor photos, or a day when you want your hair to hold without feeling stiff.
Just make sure you take it down gently at the end of the night—pull the pins first, unwind the rope braid slowly, and slide the ribbon out last so you don’t rough up the hair you worked so hard to smooth.


