
The viral crisscross ponytail looks like an intricate braid, but it’s actually achieved entirely with elastics and clever sectioning.
Some hairstyles look like they require hours in a salon chair and serious braiding skills, but this crisscross ponytail hairstyle is all about precision parting and a clever “overlay” technique. If you like hairstyles that look polished, trendy and a little intricate without needing advanced braiding skills, this one is a great style to try.
Tutorial
Crisscross Ponytail
The secret to this look isn’t a complex weave. It’s a simple 1-2-3 sectioning blueprint combined with tightly twisted strands to build a geometric pattern. Here is your step-by-step visual guide to nailing this look flawlessly, without damaging your hair.
The Pro Toolkit & Prep Guide
Before you pick up a single elastic, getting the right tools and products in front of you makes the difference between a geometric look that holds and one that starts slipping apart at the second row. Here is exactly what you need.
The Tools: A metal rat-tail comb (essential for razor-sharp parts), sectioning clips, and snag-free clear mini elastics (clear or colored polybands).
Pro-tip: Lightly coat your bands in a drop of hair oil before using them to give them extra slip and prevent snapping.
The Products: A soft styling pomade, a styling wax stick, or clear edge control. You need a product with grip to keep the twisted strands sleek.
The Golden Rule of Tension: Keep every section snug, but never bone-tight. Repeated tension from tight ponytails leads to traction alopecia. If the style feels painful, stings, or pulls the scalp into little tents, loosen it immediately.
Keep every section snug, but never bone-tight. Repeated tension from tight ponytails leads to traction alopecia. If the style feels painful, stings, or pulls the scalp into little tents, loosen it immediately. A geometric finish is never worth sacrificing the health of your hair.
Phase 1: Building the 1-2-3 Blueprint
Before any crisscrossing happens, we need to build our base grid. This acts as the anchor for the entire style. Think of it as laying down train tracks — the overlay pattern in Phase 2 can only look clean if these three rows are evenly spaced and tightly secured first.
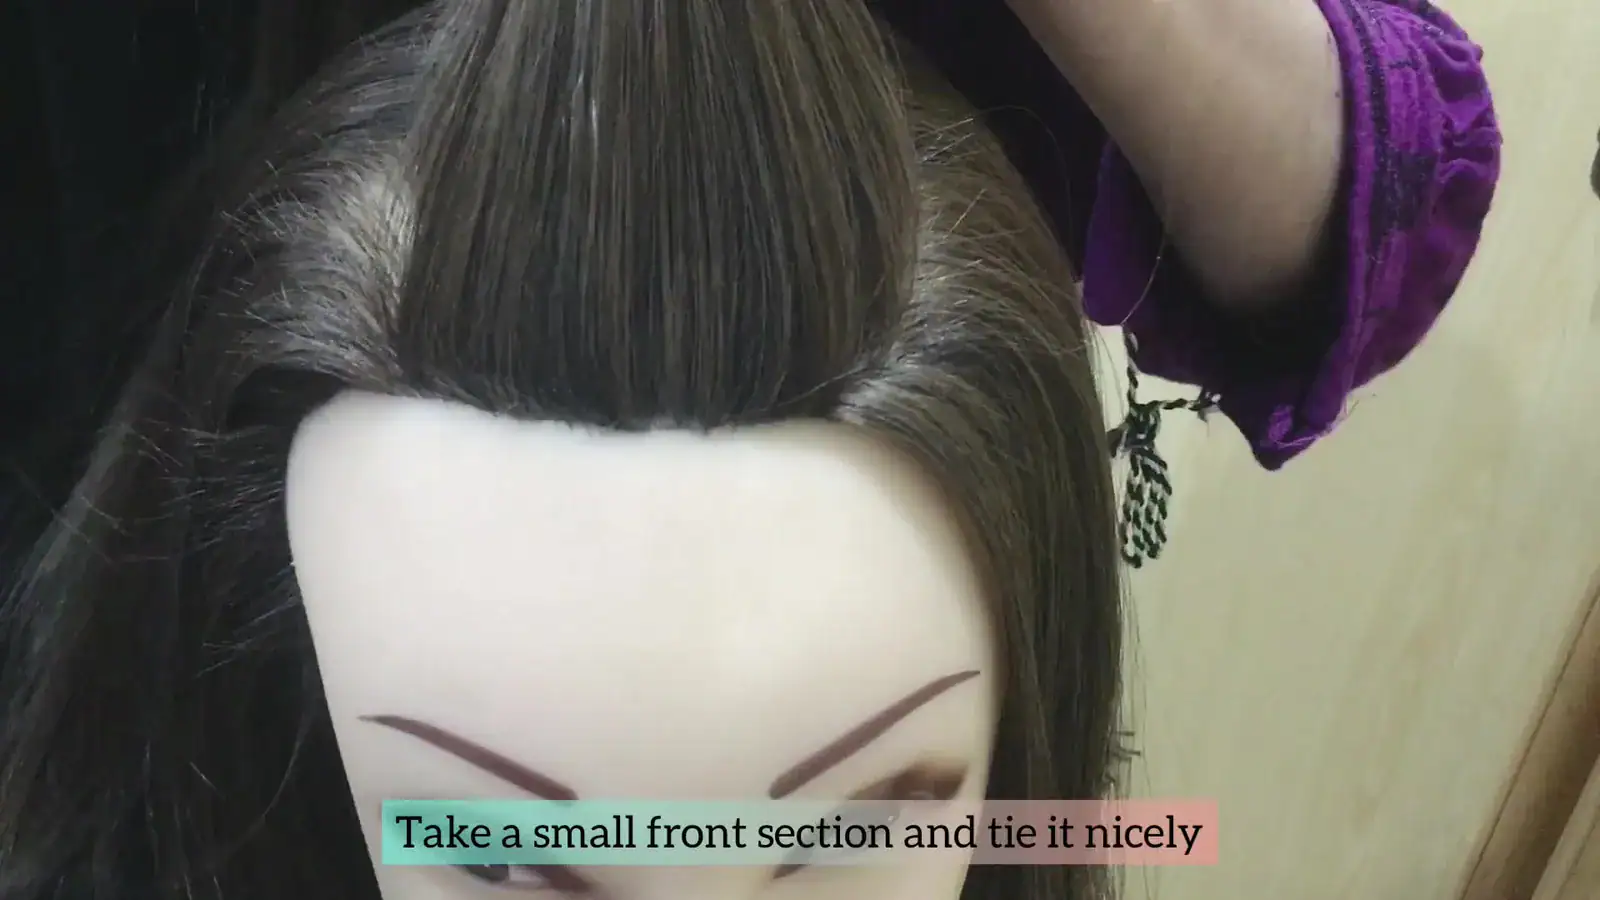
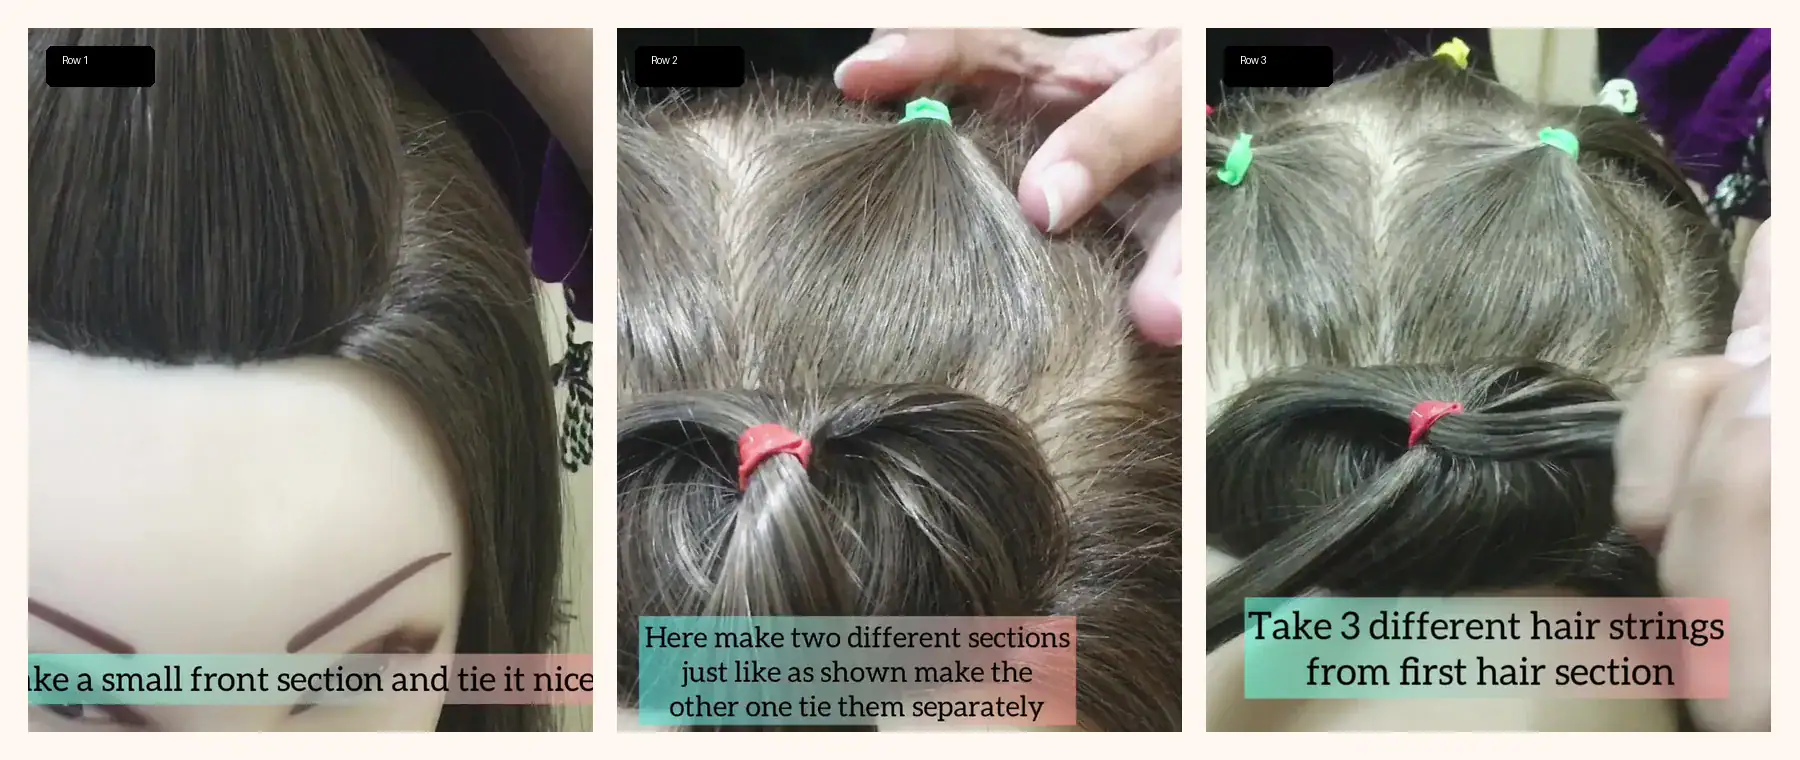
The Front Anchor (Row 1)
Using your rat-tail comb, carve out a small, perfectly centered square section right at the front hairline. Work a tiny bit of edge control into the roots and secure it tightly with a mini elastic.
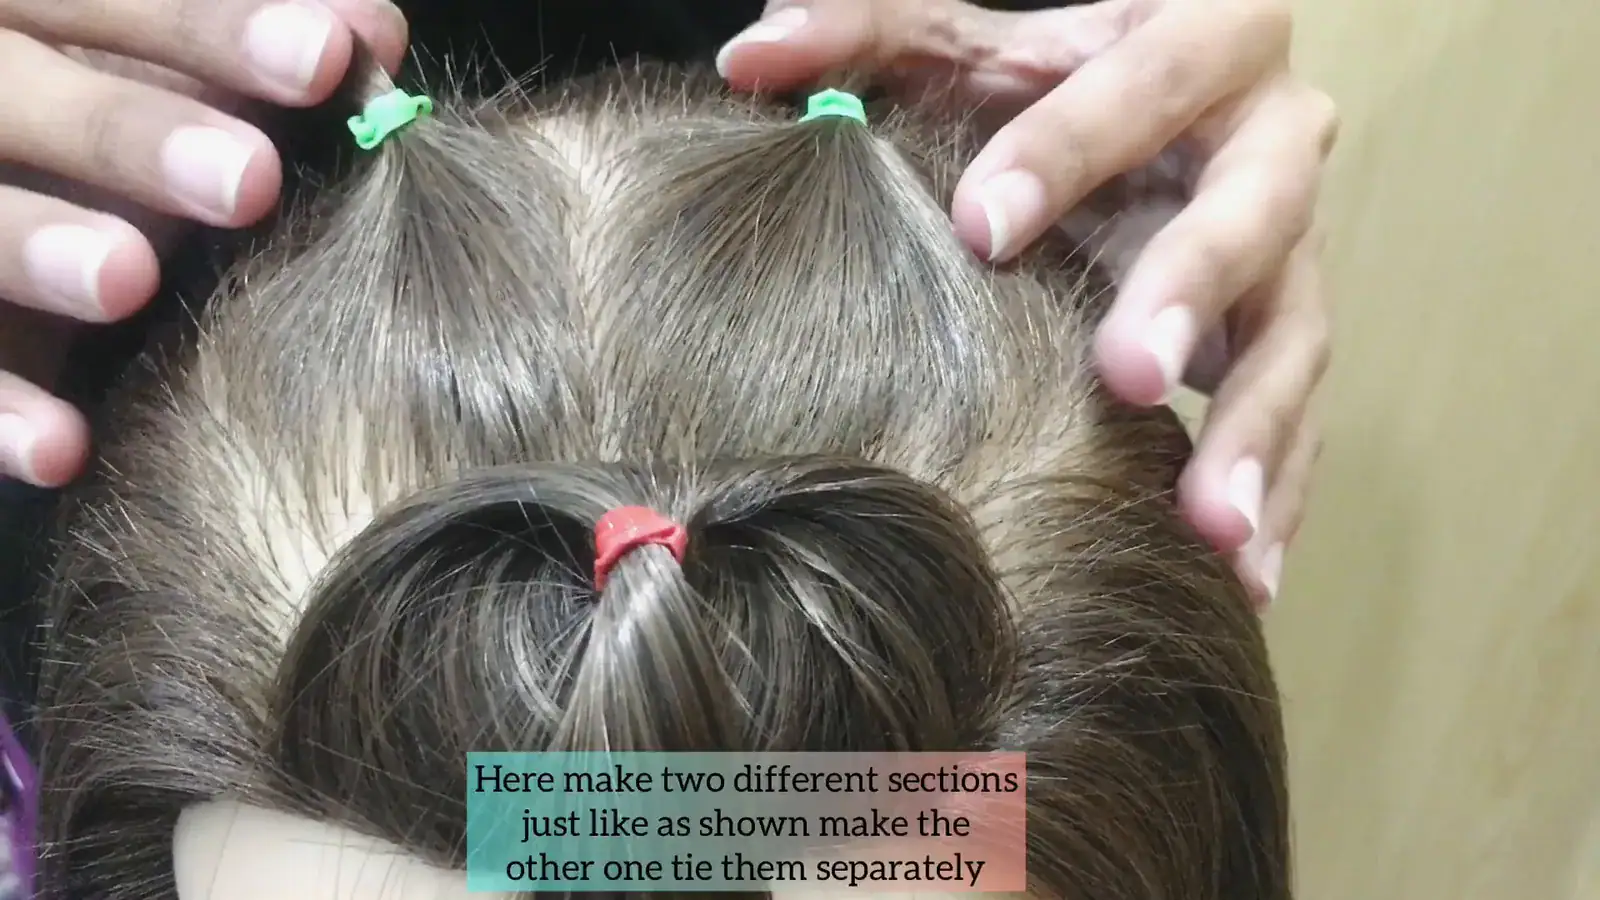
The Second Row (Row 2)
Directly behind the first ponytail, create a horizontal parting across the head. Divide this row evenly down the middle to create two square sections: one on the left, one on the right. Secure each separately. (You now have 1 pony in the front, 2 behind it.)
The Third Row (Row 3)
Create a final row behind the second, across the crown of the head. Divide this into three equal boxes: left, center, and right. Secure each separately. (Your base grid is now complete: 1 in the first row, 2 in the second row, 3 in the third row.)
Phase 2: The 3D Overlay Pattern
With all three rows locked in, you now have everything you need to build the crisscross. This is where the style goes from a flat grid of ponytails to a layered geometric pattern — and it happens faster than you would expect once the direction of each strand clicks.
Split the First Ponytail
Go back to your front anchor ponytail (Row 1). Divide the loose tail evenly into three clean mini-strands (left, center, and right).

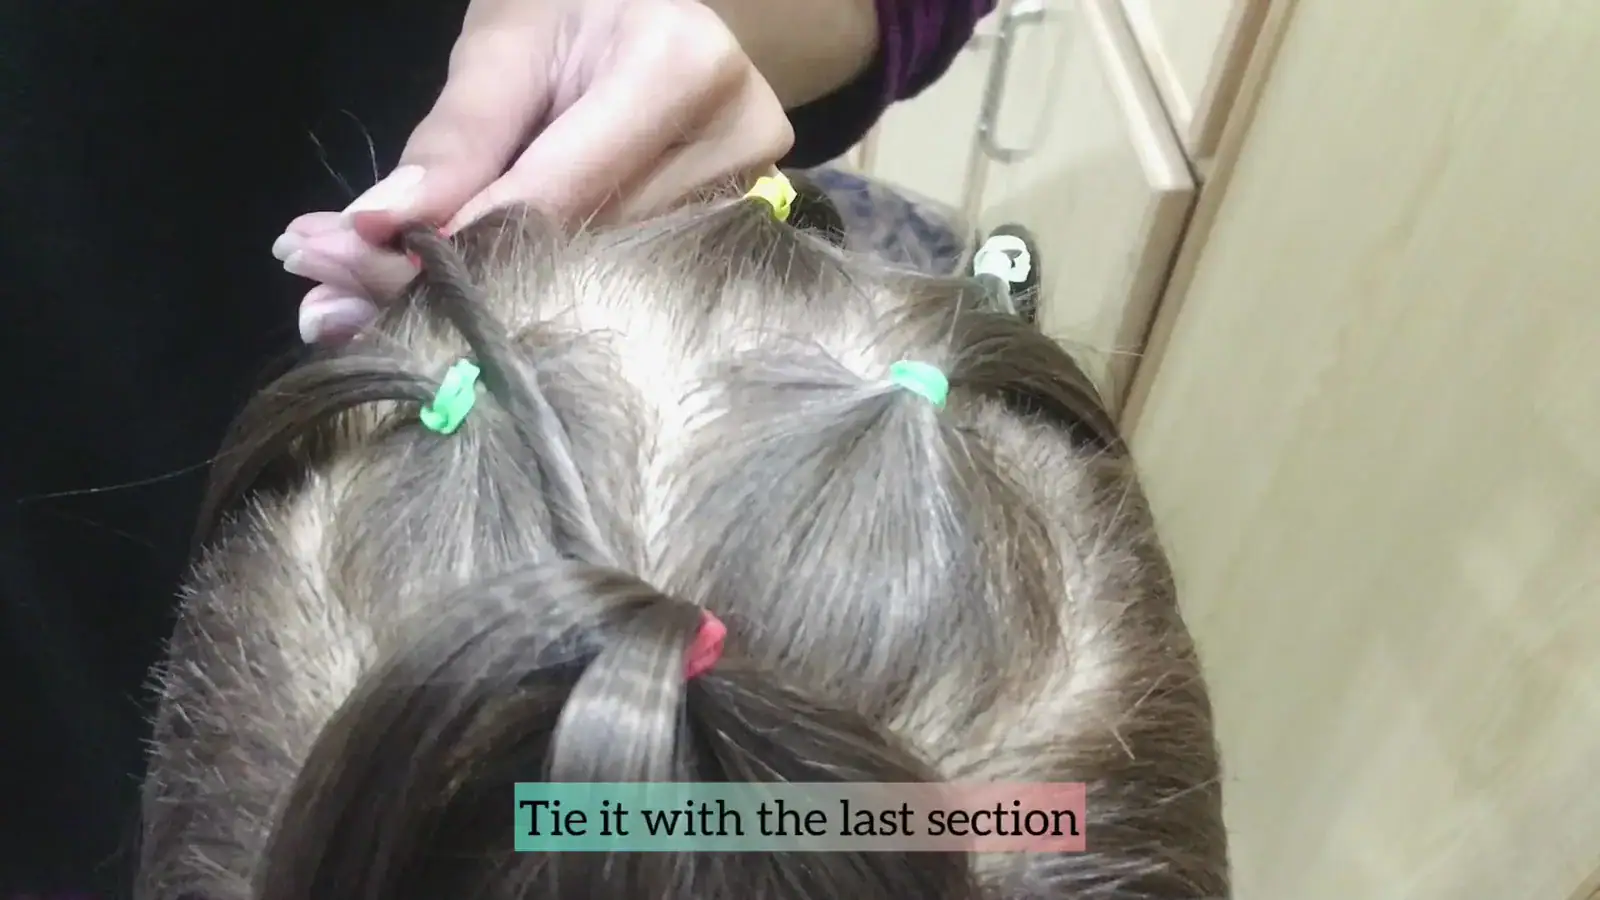
The Outer Diagonals (Bypass Row 2!)
Pinch a dab of pomade onto your fingertips and take the right strand from Row 1. Twist it tightly from root to tip so it compresses into a sleek rope. Pull it diagonally backward, completely bypassing the second row, and tie it directly onto the right ponytail in Row 3 using a fresh elastic.
Repeat on the other side: Twist the left strand from Row 1, pull it entirely over the second row, and tie it to the left ponytail in Row 3.
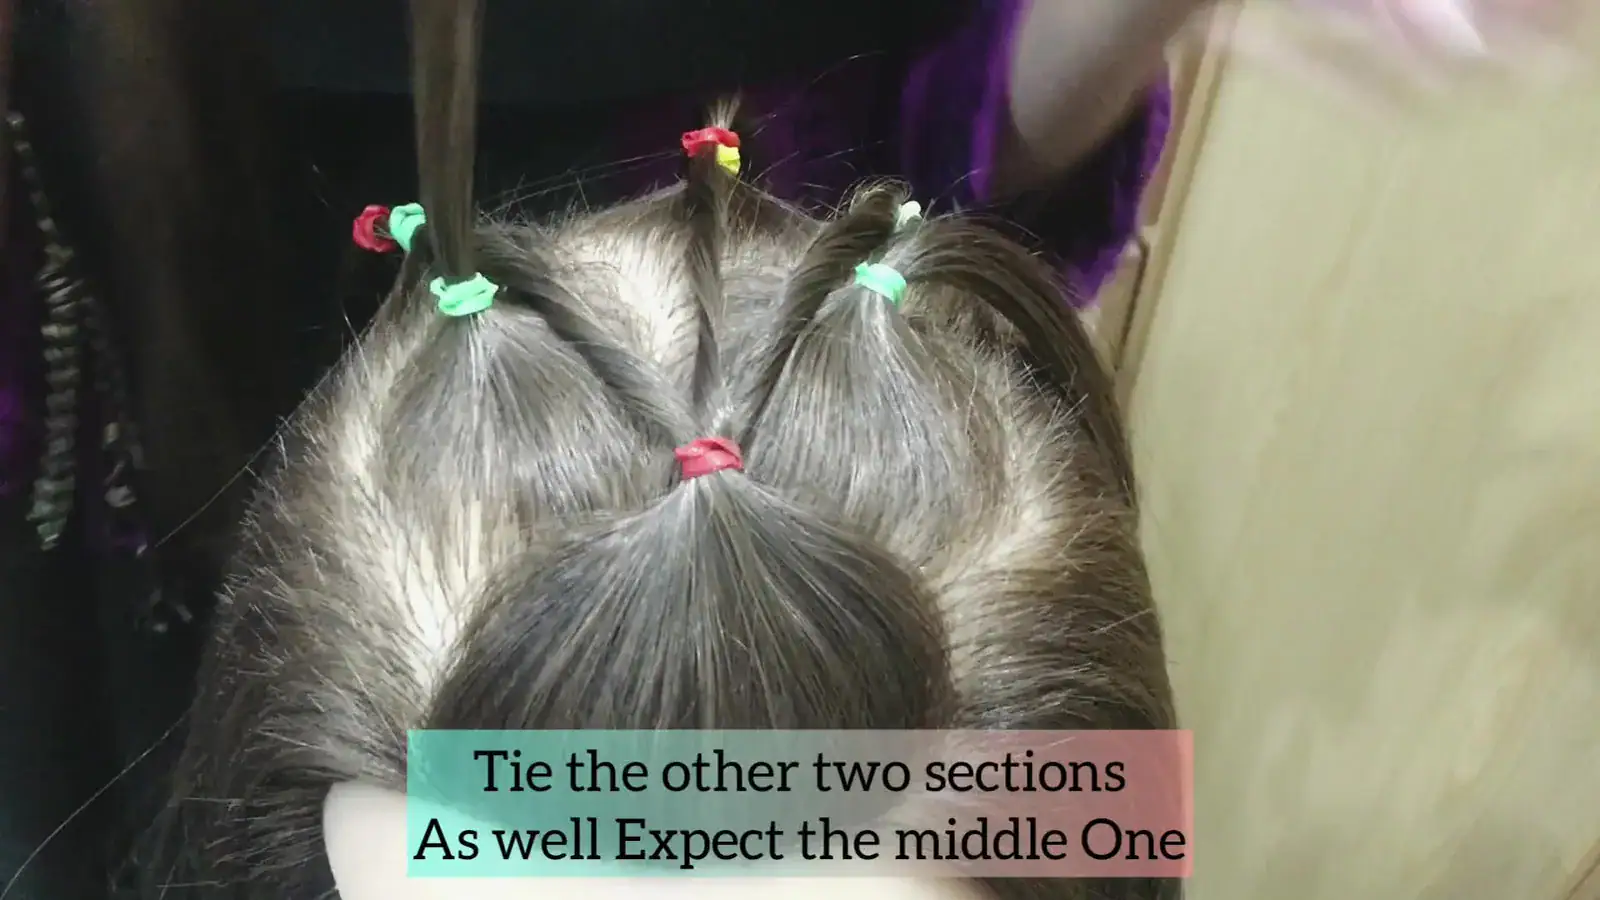
Connect the Middle Row
Now, we route the Row 2 ponytails under the outer diagonals to finish the crisscross.
Take the entire tail of the left ponytail from Row 2. Twist it smoothly into a rope, bring it diagonally back toward the center, and tie it to the center ponytail in Row 3.
Take the entire tail of the right ponytail from Row 2. Twist it, bring it diagonally back, and secure it to that same center ponytail in Row 3.
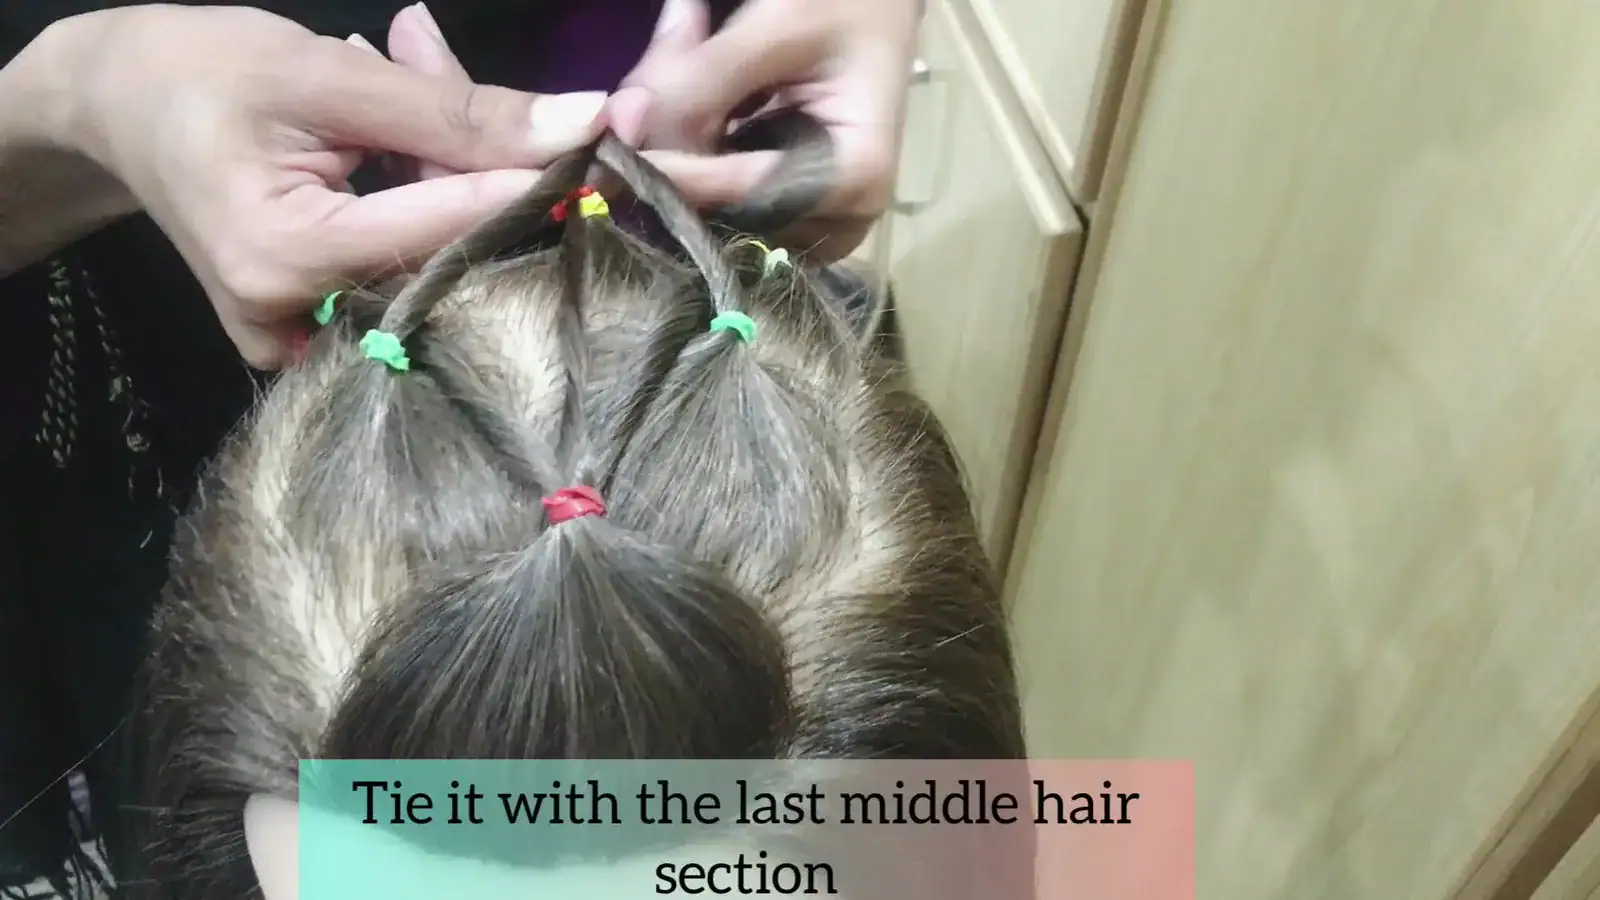
The Center Axis
Take the remaining center strand from Row 1. Twist it smoothly, pull it straight back down the middle part (again, bypassing the middle row entirely), and secure it to the center ponytail in Row 3.
Final Polish & The Flat Diamond Crisscross Variation
Step back and check your symmetry. Gently pat down any remaining flyaways with your edge control.

💡 Bonus Tip:
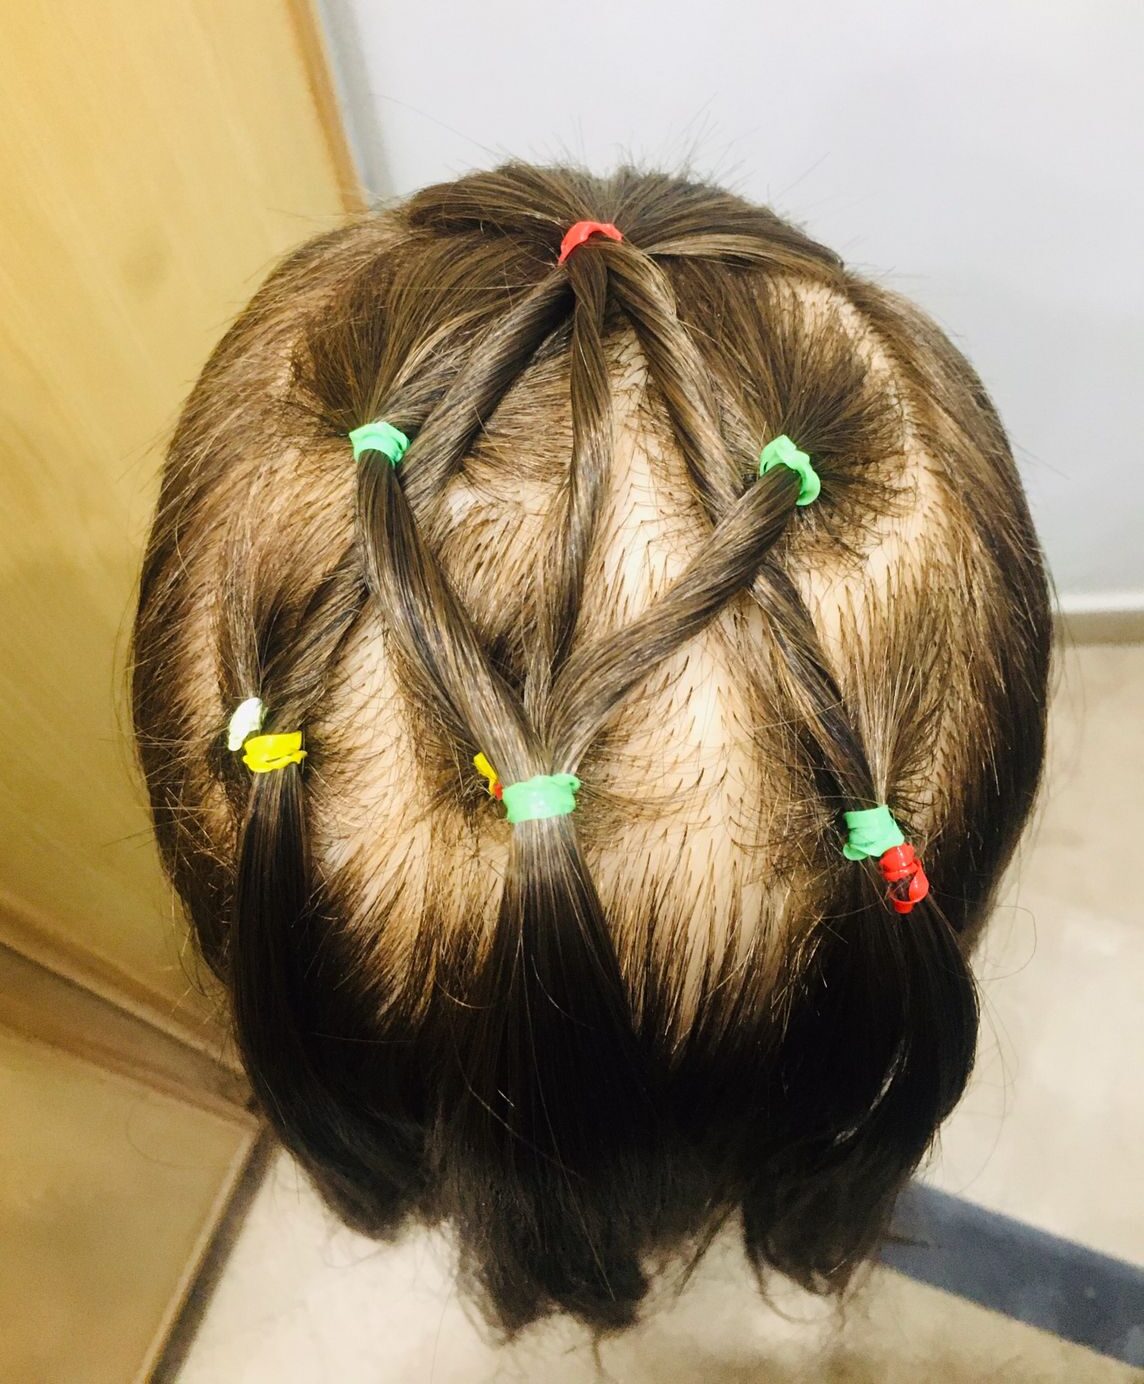
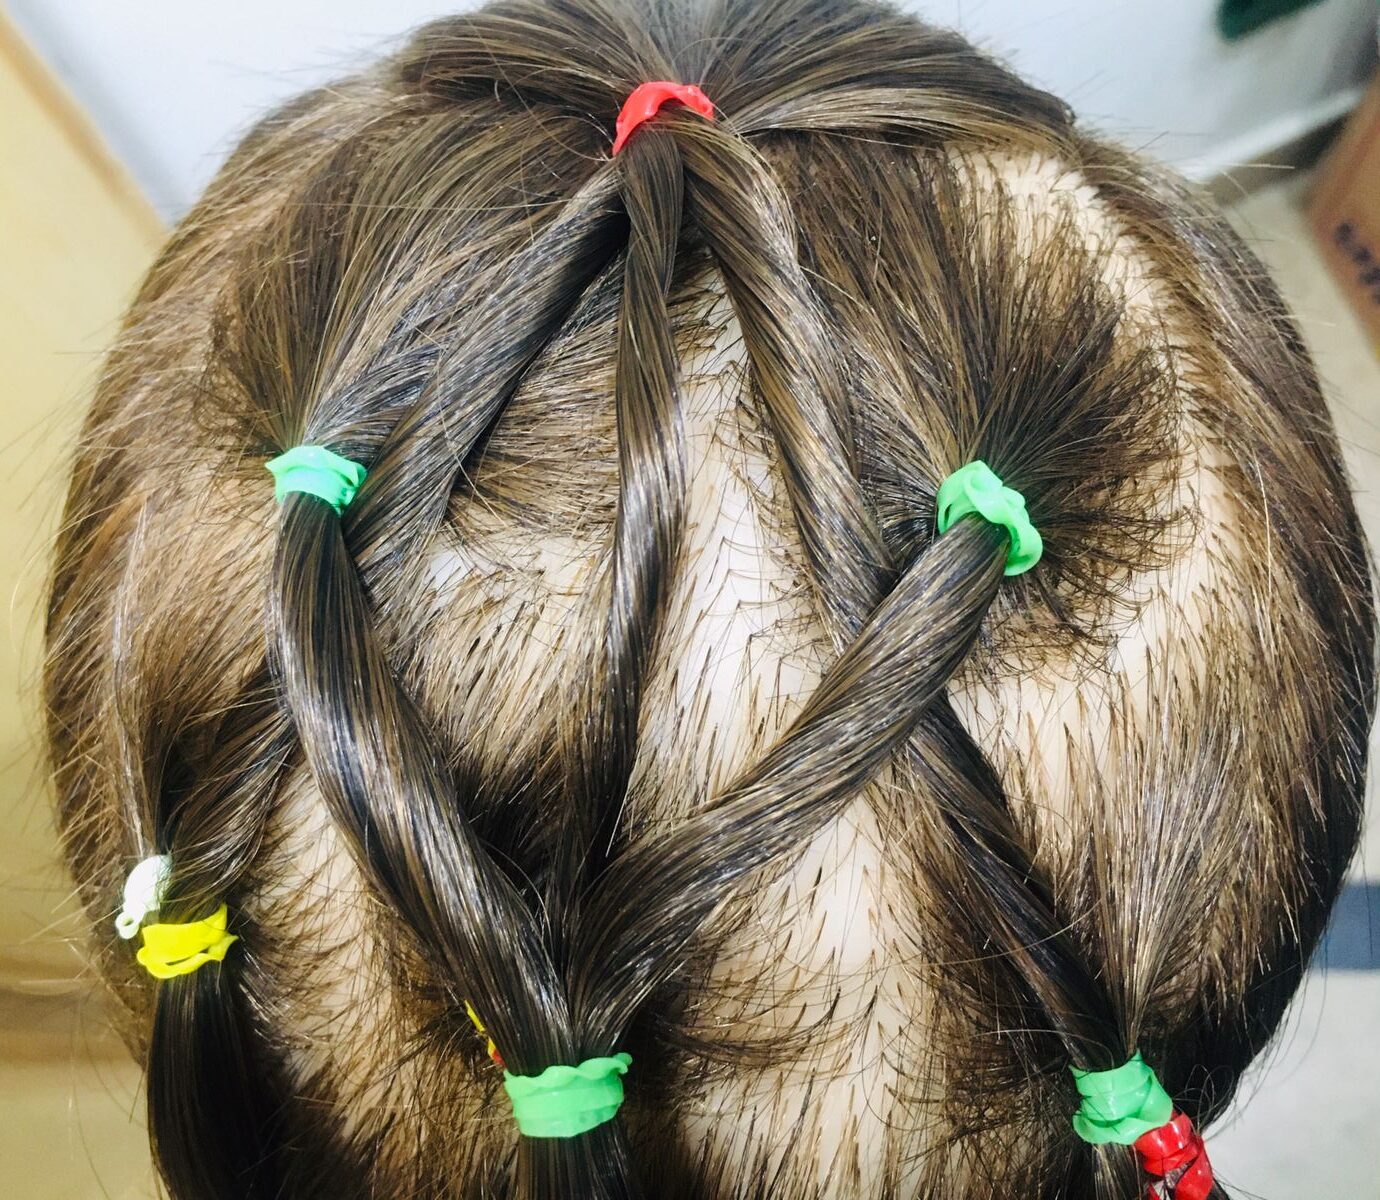
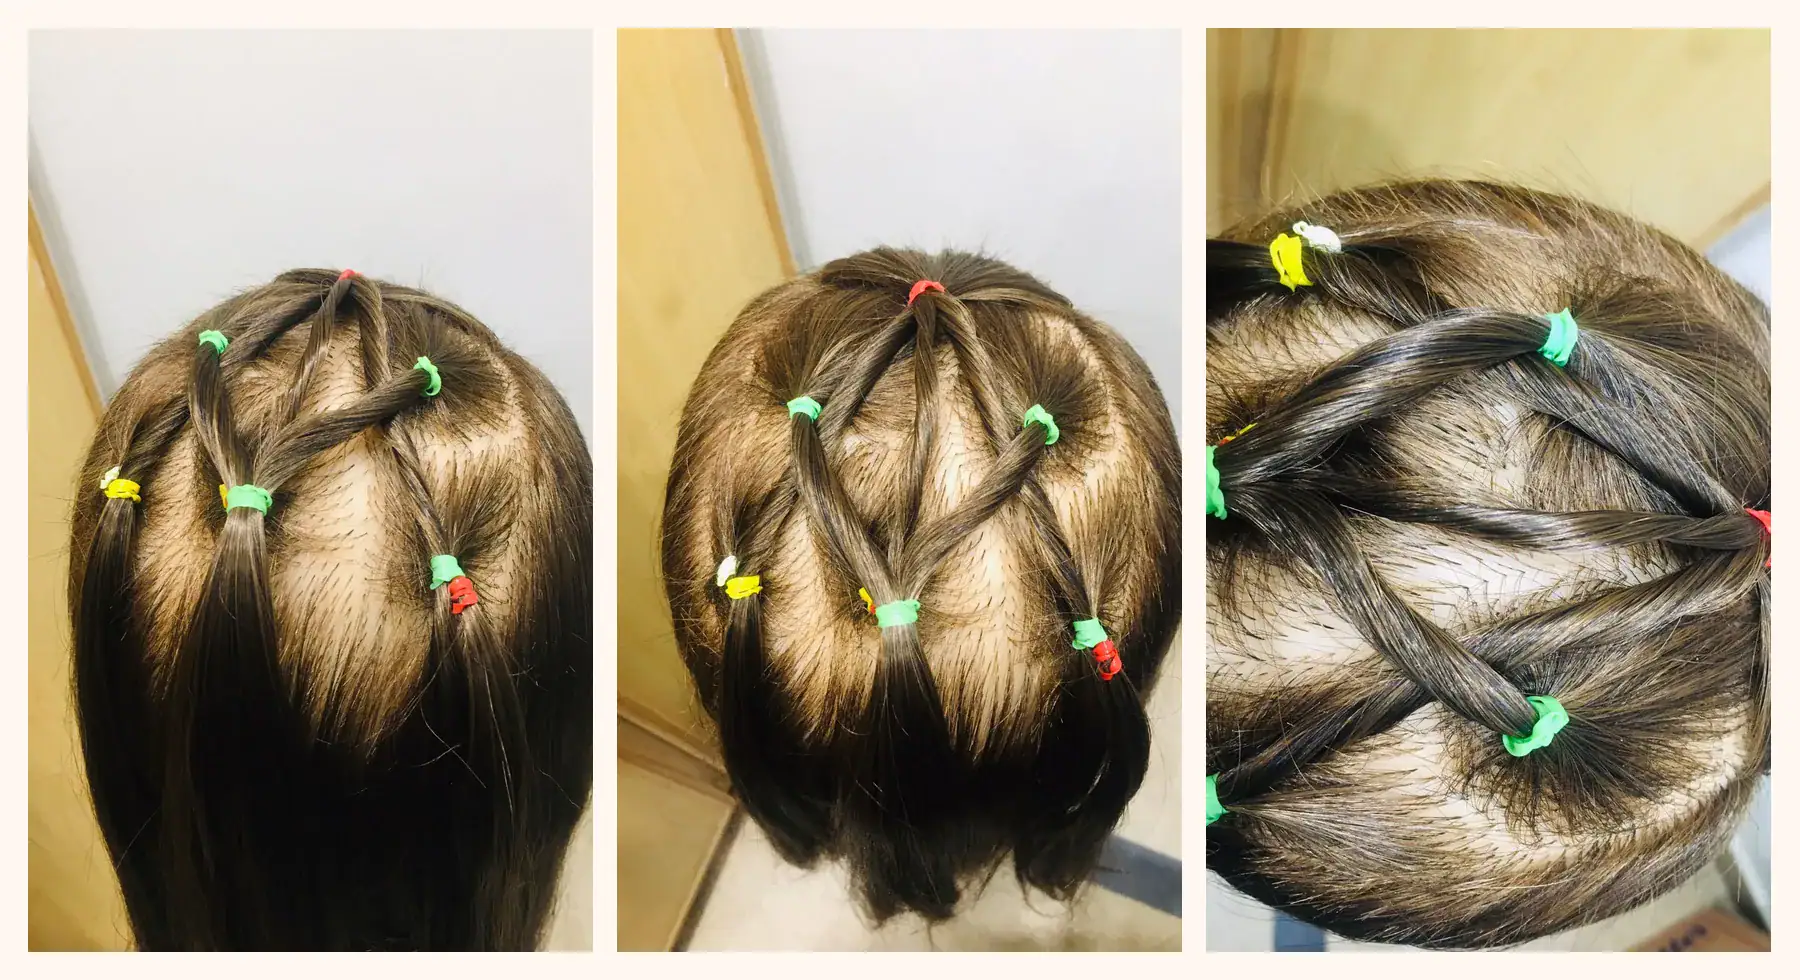
The step-by-step video tutorial above creates a gorgeous 3D Starburst overlay. However, if you want the flatter diamond crisscross look shown in the photos below, the sectioning grid is exactly the same, but the routing is slightly different.
Instead of bypassing rows, you simply split Row 1 into two strands and feed them into Row 2. Then, split Row 2 into two strands each and feed them into Row 3. Both methods are stunning, but the 3D overlay gives you a bit more pop.
You can leave the rest of the hair down, curl it with a wand or gather it into a high sporty ponytail.
Warning:
As this hairstyle layers multiple elastics on top of each other (especially in that final center section), pulling or sliding the elastics down the hair shaft at the end of the day will cause severe friction and breakage. Never slide them out. Always use a specialized hair elastic cutter or a pair of tiny manicure scissors to carefully snip each band to safely release the hair.
Now take a final look at the finished result from above — this is what the completed crisscross pattern looks like on different hair lengths and textures, including on younger wearers.
Once you understand the sectioning pattern, this crisscross ponytail becomes much easier to recreate than it first appears. The key is to work slowly, keep your parts neat, and avoid pulling the hair too tight as you build the design. After that, it’s simply a matter of connecting each section in the right direction.
Whether you wear the rest of the hair down, curled, or in a ponytail, this is one of those styles that looks eye-catching, stays versatile and gives a detailed finish with very little actual braiding involved.