
Most people toss their hair into a ponytail when they’re late and call it “done.” But in real styling, the ponytail is the base for almost every updo. Move it a little higher or lower and your whole face looks different. The most popular looks are still the high ponytail, low ponytail and a clean mid-ponytail.
Behind the chair, we hear the same complaints all the time: “My crown looks flat,” “My ponytail gets bumps,” “My cowlick won’t lay down,” or “My hairline hurts after.” Those problems usually come from placement, brush choice and the wrong elastic. A cheap tie can cause breakage. A too-tight base can stress the edges.
The trending ponytail hairstyles are sleek “clean girl” ponytails, bubble ponytails, and high-gloss ponytails with a wrap-around base.
Different Ponytail Hairstyling Ideas
Below we have discussed 40+ different ponytail hairstyle variations categorized by placement and base position, braided and twisted, texture and finish, pop-culture looks and natural-hair protective styles with tension and moisture.
Placement and Base Position
High Ponytail

Pull the hair up to the crown and you get that instant lift in photos, the kind that makes the eyes look more open and the cheekbone area look a touch higher. The tail has a clean swing to it, especially on straight or blown-out hair, and it gives the face a more “pulled together” look without needing a full glam routine.
Start by brushing the hair upward in the direction you want it to sit, then refine the base with a boar bristle brush so it lays smooth without bumps. A strong-hold hair bungee is great in such cases because you can tighten it gradually and avoid over-yanking the hairline. For polish, mist hairspray onto the brush and smooth the surface that way, instead of spraying the roots directly.
- Best for: Medium to long hair
- Texture: Straight, wavy, curly, coily
- Difficulty: Medium (achieving a perfectly smooth base takes practice)
- Occasion: Night out, red carpet, gym, high-fashion events
Mid-Level (Classic) Ponytail

Placed dead-center at the back of the head, right on the occipital bone, this ponytail sits where the hair naturally wants to fall. That’s why it tends to feel comfortable on the scalp and looks balanced from the side. It also leaves the face open, which is exactly why it works so well with earrings, collars, and everyday outfits.
Follow the natural growth pattern when you brush the sides back, then tighten in small, even pulls so the base stays level. If you want a little lift at the crown, skip rough backcombing and use your fingertips to nudge the hair upward, then smooth a small amount of product over the top so it stays controlled.
- Best for: All hair lengths (chin-length and longer)
- Texture: All textures
- Difficulty: Easy
- Occasion: Casual, everyday wear, work, errands
Low Ponytail

Gather the hair at the nape and the whole look instantly feels calmer and more refined, which is why it shows up so often in bridal styling and clean runway hair. It pairs beautifully with high necklines and sharp tailoring because the head shape stays sleek while the length falls softly down the back.
Focus on smoothing the cuticle down so the hair lies flat against the head instead of puffing up around the base. A lightweight smoothing serum through the mids and the area near the tie helps, then a comb can refine the surface without making it look oily. Keep the tie secure, but comfortable, especially at the nape where tight ponytails can feel pinchy fast.
- Best for: Bob-length to extra-long hair
- Texture: Straight, wavy, relaxed
- Difficulty: Easy
- Occasion: Office, formal events, bridal, minimalist fashion
Side Ponytail

Sweep everything over one shoulder and the ponytail immediately feels softer and more romantic, especially when it sits low near the nape. Place it higher behind the ear and it leans more retro and playful, with a little extra attitude. Either way, the drape over the shoulder is the point, so length matters here.
Before you tie, blow-dry the hair toward the side you’re choosing so the roots cooperate and the base doesn’t split or bubble. If the ponytail wants to slide back to the center, a couple of bobby pins at the base can anchor it discreetly. Waves and curls also help because they hold that over-the-shoulder shape without looking flat.
- Best for: Long hair (requires length to drape fully over the shoulder)
- Texture: Wavy, curly (curls hold the cascading shape beautifully)
- Difficulty: Easy
- Occasion: Romantic dates, retro-themed events, casual outings
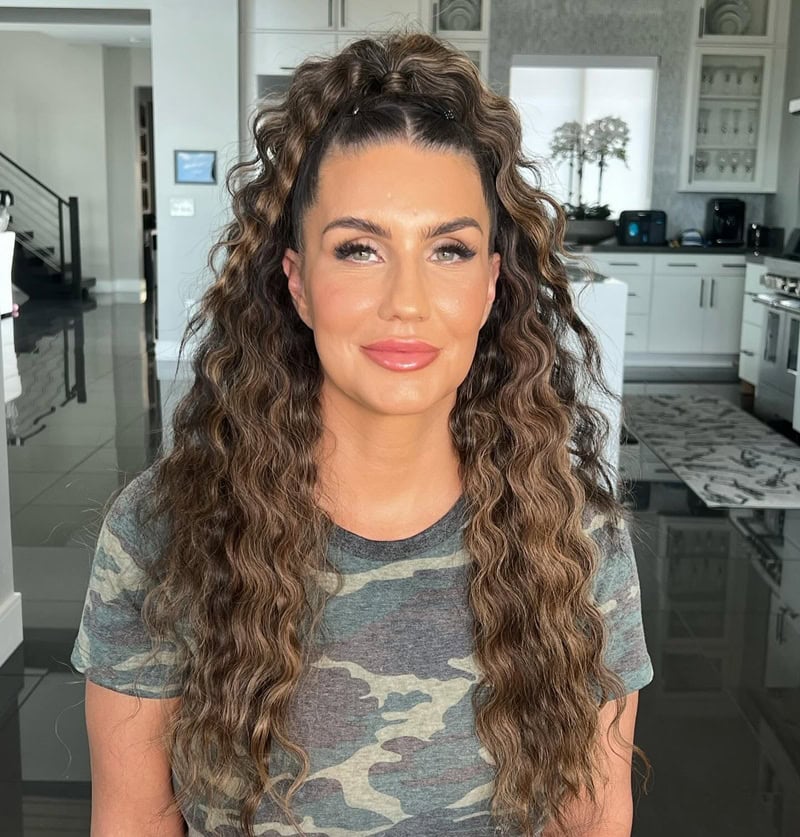
Half-Up, Half-Down Ponytail

Pulling back just the top section gives you that face-opening lift while keeping hair down your back, which is often exactly what people want when they don’t feel like committing to a full updo. It’s flattering in a very practical way: the eyes and cheekbones look more visible, while the length still feels soft and familiar.
Take the top section from above the parietal ridge and keep the parting clean so the shape looks tidy. After you secure it, pinch a little volume at the crown so it doesn’t sit flat, then leave the bottom half alone so it can move naturally. A light cream on the ends helps keep the down section smooth without weighing it down.
- Best for: Medium to long hair, thick density
- Texture: All textures
- Difficulty: Easy
- Occasion: Brunches, dates, school, casual parties
Pigtails (Twin Ponytails)

Two ponytails can feel playful or surprisingly polished depending on placement and finish. Higher placement gives more volume and bounce, while lower placement with a smooth surface feels cleaner and more fashion-forward, especially with a crisp center part.
Getting a straight center part is the hardest part of the whole style, so take your time with a rat-tail comb and check it from the back before you tie anything. Keep the tension similar on both sides so one ponytail doesn’t look tighter or smaller than the other. If you want extra control, use two bungees instead of stretching one elastic too hard.
- Best for: Medium to long hair
- Texture: All textures
- Difficulty: Medium (getting the part and symmetry exact takes time)
- Occasion: Festivals, casual streetwear, gym
Asymmetrical Ponytail

Set slightly off-center at the back of the head, this ponytail keeps the ease of a classic pony while adding a subtle twist. It’s not fully side-swept, so it still feels wearable, but the small shift changes the silhouette enough to look modern and a little unexpected.
Keep the base neat so the off-center placement looks like a choice, not a slip. On sleek hair, smooth the surface and secure firmly so it doesn’t drift back to the middle; on textured hair, let the texture carry the look and keep the base slightly softer. Choosing the side that matches your natural part or cowlick usually prevents the base from collapsing later.
- Best for: Medium to long hair
- Texture: Sleek straight, textured waves
- Difficulty: Easy
- Occasion: Art events, fashion shows, creative styling
Fountain (Whale Spout) Ponytail

Secure the ponytail at the very highest point of the head and the hair falls in every direction, which makes the tail look full from all angles. It photographs beautifully when you move because the hair fans out and then settles back into place.
Because gravity will try to pull the base backward, most people need extra support here. A double-elastic method helps keep the ponytail parked at the apex, especially if the hair is thick or long. Keep the surface smooth and touchable by using a little grip at the roots and going easy on heavy product, which can make the ponytail look weighed down.
- Best for: Short layers to long hair
- Texture: Straight, wavy, bouncy curls
- Difficulty: Medium
- Occasion: Night out, stage performances, high-energy events
Tying Techniques and Ponytail Hacks
Wrap-Around Ponytail

Covering the elastic instantly makes a ponytail look more finished, especially when the rest of the hair is smooth like a blowout. It’s a small detail, but it changes the overall effect because your eye isn’t drawn to the hair tie.
Take a small half-inch section from the underside of the ponytail, smooth it, then wrap it tightly around the elastic and pin the end underneath so it disappears. A topsy-tail tool can help pull that wrapped piece through neatly without messing up the base. If the hair is fine, a quick mist of spray on the wrap section helps it stay put.
- Best for: Medium to long hair
- Texture: Straight, wavy
- Difficulty: Medium
- Occasion: Office, formal events, polished everyday looks
Bubble Ponytail (Banded Ponytail)

Bubble ponytails look playful, but they can also look surprisingly polished when the bubbles are even and the spacing is consistent. Each band creates a rounded section, so the ponytail has shape and volume all the way down, not just at the base.
Use small clear elastics every 2–3 inches, then gently pull the sides of each section outward to “pancake” the bubbles so they look full instead of stringy. A little texturizing powder in the tail gives grip and helps the bubbles stay puffed. Keep the tension consistent between elastics so one bubble doesn’t collapse while the next one balloons.
- Best for: Long, thick hair (or fine hair utilizing extensions)
- Texture: Straight, wavy
- Difficulty: Medium
- Occasion: Festivals, parties, modern bridal, creative looks
Topsy Tail (Inverted/Flipped) Ponytail

Flip the ponytail through itself and you get a soft twist at the base without adding any extra pins or braids. It’s one of the quickest ways to make a low or mid ponytail feel more styled, and it conveniently hides the elastic at the same time.
Tie the ponytail loosely first, then make a vertical split directly above the elastic and feed the tail up and through the gap. Tighten slowly so the twist stays smooth rather than turning into a tight knot. Leaving out a couple of face-framing pieces can make the twist look softer around the front.
- Best for: Short to long hair
- Texture: All textures
- Difficulty: Easy
- Occasion: Work, casual events, bridal guest
Pull-Through Ponytail
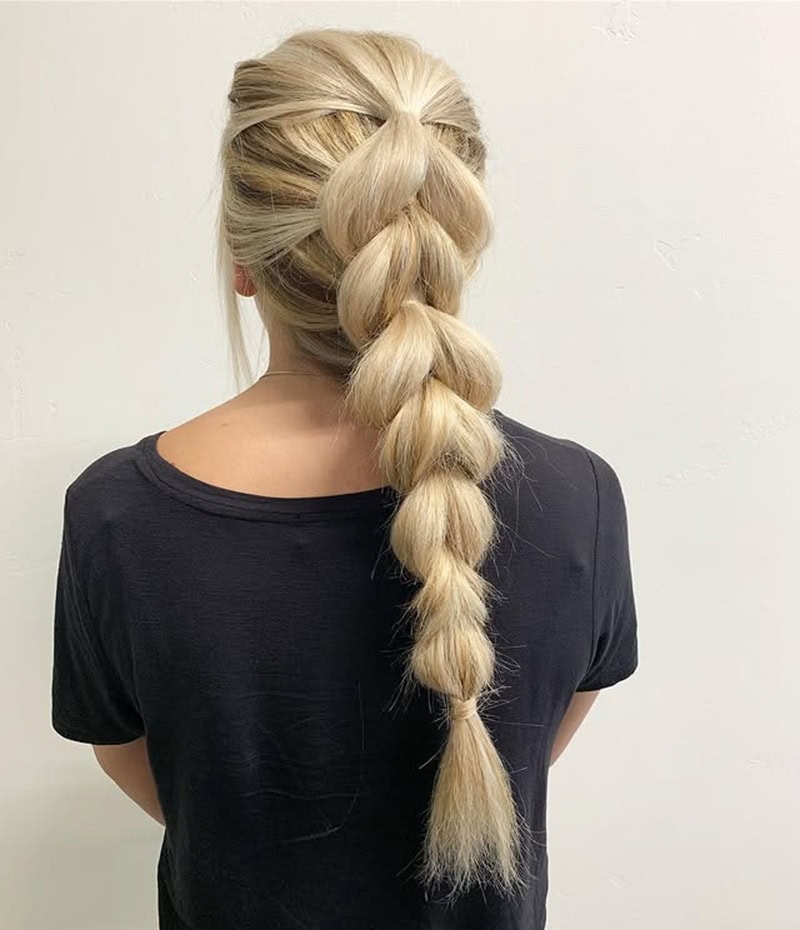
The pull-through ponytail gives you that big, braided look without actually braiding the length, which is why it’s a favorite for long days and high-movement events. It creates a thick, stacked shape that holds its volume and stays very secure.
Section the hair, tie a ponytail at the top, split it in half, then pull the next ponytail through and repeat down the length. Clean partings and tight elastics make the finished shape look smooth and consistent, and a little grip product keeps sections from sliding. Once it’s built, it stays put far better than a loose braid that can loosen over time.
- Best for: Long, thick hair
- Texture: Wavy, straight
- Difficulty: Advanced
- Occasion: Prom, bridal, formal galas, active sports
Double Ponytail (Length Hack)

Want a longer-looking ponytail without extensions? Stacking two ponytails does the job. The top ponytail drapes over a hidden ponytail underneath, so the eye sees one long, full tail instead of two separate sections.
Tie a half-up ponytail at the crown, then tie a second ponytail directly beneath it at the mid-head. The top section covers the lower elastic, which makes the join disappear, especially on wavy or curly textures that blend easily. Keep the base smooth so the top ponytail lays neatly over the hidden one.
- Best for: Medium hair (shoulder to armpit length)
- Texture: Wavy, curly (texture blends the two sections seamlessly)
- Difficulty: Medium
- Occasion: Night out, dates, when extra volume is needed
Hidden Claw Clip (Volume Hack)

Extra lift at the base makes a ponytail look fuller, and this trick gives you that boost without teasing. It’s especially helpful for fine to normal density hair that tends to fall flat, because the ponytail sits higher and looks more voluminous in photos.
Split the ponytail horizontally in half, clamp a mini claw clip onto the base of the elastic under the top half, then let the top layer fall over it to hide the clip. The lift comes from support, not friction, so the hair stays smoother and less stressed. If the clip shows, use a smaller one or place it slightly lower under the ponytail.
- Best for: Medium to long hair, fine to normal density
- Texture: Straight, wavy, curly
- Difficulty: Easy
- Occasion: Everyday volume, casual glam, photo shoots
Tiered / Multi-Level Ponytail (Faux Hawk)

Layered hair that keeps popping out of a single ponytail tends to behave much better with a tiered approach. Stacking three or four ponytails down the center keeps the shorter pieces secured, and it creates a subtle faux-hawk line through the back of the head.
Create the top ponytail, then add the next ponytail beneath it, feeding the hair from the first into the second, and repeat down the center. Clean sections and consistent tension keep the shape looking neat, especially at the crown where bumps show easily. For sports or the gym, this setup is one of the most reliable ways to keep layers from escaping.
- Best for: Short to medium layered hair
- Texture: Straight, wavy, curly
- Difficulty: Medium
- Occasion: Gym, sports, edgy streetwear
Knotted Ponytail

Skip the elastic at the base and tie the hair into an actual knot at the nape for a clean, modern finish. It works best on very straight, slippery hair because the knot looks crisp, and the base looks tidy without a visible tie.
Work a smoothing serum through the hair first so it behaves, then split it into two sections and tie a square knot at the nape. Secure the knot underneath with pins or a clear elastic so it doesn’t loosen during the day. Keeping the knot flat against the head helps it look sleek rather than bulky.
- Best for: Medium to long, fine/slippery hair
- Texture: Pin-straight
- Difficulty: Medium
- Occasion: Modern minimalist fashion, office, elegant dinners
Loop Ponytail

The loop ponytail is quick, cool, and genuinely useful when you want hair out of the way without doing much. The ends stick out at the neck like a little fan, which gives the style a playful edge and keeps it from looking like you simply ran out of time.
On the final wrap of the elastic, pull the hair only halfway through so you create a teardrop loop. Shape the loop with your fingers and let the ends sit naturally. A tidy base matters on straight hair, because any bumps or uneven tension show more in this style.
- Best for: Short (bob) to medium hair
- Texture: Straight, sleek
- Difficulty: Easy
- Occasion: Gym, quick errands, fashion-week street style
Braided and Twisted Ponytails
Braided Base Ponytail

Adding braids at the scalp and then letting the tail flow gives you the best of both worlds: detail through the front and sides, and movement through the back. French, Dutch, or cornrow sections keep the roots tidy and reduce bulk, so the ponytail itself feels lighter and swings nicely.
Stop the braid right at the elastic so the ponytail still has that soft, swishy finish. Keep braid tension firm, but comfortable at the hairline, especially if you’re wearing it all day. For extra hold during workouts or festivals, press a small amount of styling gel into the sections before braiding, then secure the base with a bungee so you can tighten without pulling too hard.
- Best for: All hair lengths
- Texture: All textures
- Difficulty: Advanced (requires scalp braiding skills)
- Occasion: Sports, festivals, casual wear
Braided Tail Ponytail

Start with a sleek ponytail, then braid the tail down to the ends for a style that stays neat through wind, workouts, and long days. It’s a genuinely protective option because the hair is contained, which helps reduce tangling and friction on the length.
Prep the ponytail with a light leave-in or smoothing serum, especially if the ends are dry, so the braid stays glossy and tight. Keep your tension even as you braid, then finish with a small elastic that matches your hair color. If you want a cleaner finish at the end, wrapping a thin strand around the elastic works well on longer lengths.
- Best for: Medium to extremely long hair
- Texture: All textures
- Difficulty: Easy
- Occasion: Gym, hiking, sleek nighttime looks, high-fashion
French Braid Ponytail

Begin a classic French braid at the hairline, incorporate hair as you move back, then tie it off into a ponytail at the crown or nape. The top stays controlled and secure, while the ponytail keeps the look light and wearable.
It’s especially helpful on heavily layered cuts because the braid catches shorter pieces that usually slip out. A light texturizing spray before you start gives the sections grip so they don’t slide. After you tie it off, loosen the braid slightly with your fingertips at the crown if you want it to look fuller without getting messy.
- Best for: Medium to long hair, heavily layered hair
- Texture: Straight, wavy
- Difficulty: Medium
- Occasion: Everyday, school, athletic wear
Dutch Braid Ponytail

Using the underhand technique, the Dutch braid sits raised on top of the hair, which makes it look more three-dimensional from the front and side. When that braid feeds into a ponytail, you get a style that feels sporty but still soft, especially if the ponytail has a little wave.
After you secure the ponytail, gently tug the outer edges of the braid to widen it and give it that boho volume people love. Keeping the hairline neat helps the braid look clean rather than fuzzy, especially in photos. A small amount of grip product at the roots also helps on very smooth hair so the braid stays fuller longer.
- Best for: Medium to long, thick hair
- Texture: Wavy, straight
- Difficulty: Medium
- Occasion: Boho weddings, festivals, sports
Fishtail Ponytail

Fishtail braiding on the ponytail length gives a really intricate finish without changing the base. You weave two sections by taking tiny pieces from the outer edges and crossing them inward, and the pattern ends up looking detailed and almost jewelry-like on long hair.
Small sections create the prettiest pattern, but they also take time, so plan for that. A light texturizing spray on the tail helps the strands stay put while you work, and keeping your tension consistent makes the braid look even. Once you’re finished, pulling the fishtail slightly wider softens it and makes it look fuller.
- Best for: Long hair
- Texture: Straight, wavy
- Difficulty: Advanced
- Occasion: Bridal, bohemian events, photoshoots
Rope Twist Ponytail

Twisting the ponytail into a rope gives the length a sleek, glossy look with very little effort. It works well when you want the ponytail to stay tidy, especially for gym days or minimalist outfits where you don’t want hair flying everywhere.
Split the tail into two sections, twist both sections to the right, then cross them over each other to the left so the opposing tension locks the twist in place. That counter-tension is what stops it from unraveling. On coily hair, a little moisture or curl cream through the tail helps the twist look smooth and stay defined.
- Best for: Long hair
- Texture: Straight, sleek, coily
- Difficulty: Medium
- Occasion: Sleek evening wear, minimalist looks, gym
Crown / Halo Braid Ponytail

Braiding from the temple along the front hairline creates a soft “headband” effect, then everything gathers into a low or mid ponytail at the back. It’s one of our favorites for growing out bangs because it keeps the front controlled while still feeling romantic around the face.
Keep the braid close to the hairline so the shape looks clean and secure, then pin any short pieces behind it so they don’t pop out. Leaving a little softness at the temples can be very flattering, especially if you’re trying to soften a sharper jawline. The ponytail placement can stay low and easy so the braid remains the star.
- Best for: Medium to long hair
- Texture: Wavy, curly, straight
- Difficulty: Advanced
- Occasion: Weddings, romantic outings, spring events
Upside Down Braid Ponytail

Flip your head upside down and braid from the nape up to the crown, then pull everything into a high ponytail. From the front it looks like a standard high ponytail, and the braid becomes a surprise detail when you turn around, which is why it’s so popular for dance and stage looks.
Braiding upside down is the tricky part, so a hand mirror helps while you work. Smoothing the nape with a little gel before you start can keep the braid looking clean and reduce fuzz. Once you reach the crown, secure everything with a firm elastic or bungee so the braid and ponytail feel like one piece.
- Best for: Medium to long hair
- Texture: Straight, wavy
- Difficulty: Advanced (requires braiding upside-down)
- Occasion: Dance, gymnastics, edgy parties
Accent Braid Ponytail
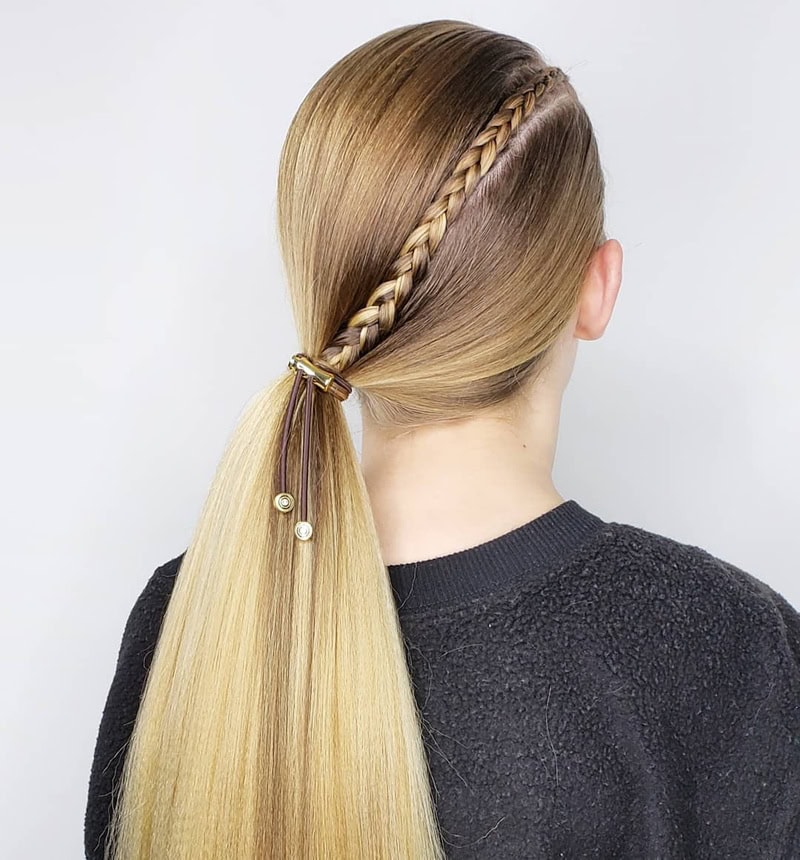
Add one or two tiny micro-braids to a regular ponytail and it immediately feels more styled, with a hint of Y2K or boho energy. You can hide the braids inside the tail for a subtle detail, or place them near the face for something more noticeable.
Placement and neatness make all the difference. Braid tightly, secure with a tiny clear elastic, and keep the braid size consistent so it looks polished. If your hair is very smooth, warming a touch of styling wax between your fingers before braiding helps the strands stay together.
- Best for: All hair lengths
- Texture: Wavy, straight
- Difficulty: Easy
- Occasion: Casual, music festivals, beach days
Macramé / Corset Ponytail

On very long, pin-straight hair, tying small sections into a grid or weaving ribbon through the ponytail creates a laced, corset-like surface. It’s a statement look and it takes patience, but the result is striking in photos and on camera because the pattern is so graphic.
Hair needs to be completely detangled, because one snag can throw off the whole pattern. Clip off clean sections first, then build the knots with steady, consistent tension so the grid stays even from top to bottom. If you’re using ribbon or cord, keep it smooth and soft so it doesn’t catch on the hair as you weave.
- Best for: Very long, straight, fine-to-medium hair
- Texture: Pin-straight (must be completely tangle-free)
- Difficulty: Highly Advanced
- Occasion: Hair shows, editorial photoshoots, avant-garde fashion
Texture and Finish
Sleek & Straight (Glass Hair) Ponytail

Going for a sleek, straight ponytail is all about the surface: smooth roots, flat lengths, and a shine that catches the light evenly. Blow-dry the hair straight, then flat-iron in thin sections so flyaways disappear and the ponytail looks clean from every angle.
Heat-styling needs a little discipline here, so use a heat protectant, keep sections paper-thin, and avoid hovering the iron in one spot. For the base, apply a strong-hold edge gel with a brush so you can smooth without leaving clumps of product. Shine spray belongs on the lengths, while the roots should stay fresh and not oily.
- Best for: Medium to long hair
- Texture: Naturally straight or chemically straightened hair
- Difficulty: Medium (requires intense heat-styling precision)
- Occasion: Red carpet, black-tie, high-fashion
Messy / Undone (Bedhead) Ponytail

Use your fingers instead of a brush and the ponytail instantly looks more relaxed. Little bumps and soft flyaways are part of the charm here, especially on layered, wavy hair, because it keeps the style from looking too “done.”
Add dry shampoo or sea salt spray at the roots first so the hair has grip, then gather it loosely and tie it without overworking it. After it’s up, lift the crown gently with your fingertips to open the shape. If everything looks too perfect, raking a few pieces back out with your fingers usually fixes it.
- Best for: Short to medium hair, layered cuts
- Texture: Wavy, textured
- Difficulty: Easy
- Occasion: Casual weekend wear, running errands, relaxed dates
Voluminous / Bouffant (The Pouf)

Big crown volume with a ponytail behind it gives that classic 60s-inspired shape that lengthens the face and draws attention to the eyes. It’s especially pretty for events because it looks polished from the front, even if the ponytail itself is simple.
Backcomb the crown to create a sturdy cushion, lock it in with hairspray, then smooth the top layer gently over it so the surface stays neat. Taking it down matters as much as putting it up, so use conditioner or detangling spray and work slowly to avoid snapping hair while you remove the tease.
- Best for: Medium to thick hair
- Texture: Straight, wavy
- Difficulty: Medium
- Occasion: Retro parties, formal events, bridal
Curly / Ringlet Ponytail

Keep the base sleek or keep it soft, but let the tail do the work. Defined curls give the ponytail a romantic bounce, and they look especially good in photos because the shape stays visible instead of blending into one flat tail.
For natural curls, a curl-defining mousse helps the ponytail dry with separation and shine, and it’s best not to touch it too much while it sets. For straight hair, a 1-inch wand creates ringlets that hold well if you let each curl cool before moving on. Avoid brushing them out if you want the ringlet shape to last.
- Best for: Medium to long hair
- Texture: Naturally curly or heat-curled straight hair
- Difficulty: Medium
- Occasion: Prom, weddings, romantic date nights, pageants
Wavy / Beachy Ponytail

Loose S-waves in the tail make a ponytail feel easy and summery, especially with a slightly matte finish. It’s the kind of hair that looks better when it’s not too perfect, because the wave pattern does the styling for you.
Build the wave with a deep waver tool or by sleeping in braids, then brush through the tail so it looks relaxed rather than tightly set. Keeping the base a little softer helps the look feel cohesive, since a very tight base with a very soft tail can look mismatched. A dry texture spray through the lengths helps the wave hold without turning shiny.
- Best for: Medium to long hair
- Texture: Wavy
- Difficulty: Easy
- Occasion: Beach days, summer outings, casual wear
Crimped Ponytail
Crimping the tail brings back that Y2K zig-zag texture in a way that can look bold and very photo-friendly. It also makes the ponytail look bigger because the hair expands once it’s crimped, so you get more volume without adding extensions.
Crimping takes time if you want it to look even, so use heat protectant and work in small sections with a consistent pattern. A sleek base tends to look best because it keeps the focus on the texture in the tail. If the ends feel too fluffy, a tiny amount of serum just on the tips helps bring them back under control.
- Best for: Medium to long hair
- Texture: Straight (prior to crimping)
- Difficulty: Medium (time-consuming to crimp perfectly)
- Occasion: Themed parties, editorial shoots, music videos
Wet-Look Ponytail

Using the wet-look finish gives the ponytail that just-out-of-the-shower shine, with hair slicked back tight and glossy from root to tail. It’s bold and clean, and it works best when the surface is smooth and reflective without looking flaky or crunchy.
Work on damp hair and layer product with a comb so you get slip and shine without clumps. Start with a leave-in conditioner, add a strong gel that dries clear, then finish with a small amount of glossing oil through the lengths. Wash it out properly afterward, because heavy gel can build up if it sits on the hair for days.
- Best for: Short to long hair
- Texture: Straight, wavy, curly
- Difficulty: Medium
- Occasion: Red carpet, runway, edgy nights out
Fluffy / Blowout Ponytail

A fresh round-brush blowout in a ponytail gives you that 90s supermodel bounce: airy volume, soft movement, and ends that flick with a little swoop. It’s the opposite of a flat ponytail, which is why it looks so good for dinners, events, and anything that involves photos.
Use volumizing mousse, round-brush the lengths, then let the hair cool so the shape holds. Rolling the ponytail into a large Velcro roller for a few minutes can help set the bend in the ends. Tie the base gently so you don’t crush the volume you just built.
- Best for: Long, thick hair with layers
- Texture: Straight to wavy (blowout texture)
- Difficulty: Advanced (requires excellent blow-drying skills)
- Occasion: Pageants, upscale dinners, luxury events
Pop Culture and Era Trends
“Barbie” Ponytail
High placement, high shine, and a side-swept bang that sits close to the forehead give this ponytail its doll-like polish. The last detail is the flip: those ends turned outward so the tail looks bouncy and styled, even from the side.
Focus on the swoop first by smoothing it with a wax stick or strong gel, then set it lightly with hairspray so it stays flat without looking stiff. For the flip, use a flat iron and turn your wrist outward at the last inch. Keeping the rest of the tail sleek makes the flipped ends look crisp instead of messy.
- Best for: Medium to long hair
- Texture: Sleek straight with flipped ends
- Difficulty: Medium
- Occasion: Parties, trendy night out, pop-culture events
Ariana Grande Ponytail

Set extremely high and pulled very tight to the scalp, this is the modern “mega pony” with serious length and a thick wrap-around base. The height changes the whole profile, and the long tail gives it that stage-ready drama people associate with the look.
Most people need extensions to get the length and density, and that added weight has to be secured safely. Anchor the base firmly, attach the extension with proper support, then wrap a thick section of hair around the base to hide the join. If the ponytail hurts or you feel pulling along the hairline, it’s too tight, and loosening it is the smart move.
- Best for: Long hair (or any length utilizing extensions)
- Texture: Sleek straight
- Difficulty: Advanced (requires safely securing heavy extensions)
- Occasion: Concerts, stage performances, clubbing
Y2K Spiky Ponytail

High or mid placement with pin-straight ends that fan out into stiff “spikes” gives you that early-2000s finish right away. The shape is sharp and a little mischievous, and it works best on shorter to medium lengths where the ends can flare out.
Flat-iron the ends first, then use gel or wax to separate small sections and set each spike. Avoid coating the whole tail, because it can turn into one sticky piece instead of defined points. For a stronger silhouette, angle the spikes slightly outward so they fan rather than droop.
- Best for: Short (bob length) to medium hair
- Texture: Straight
- Difficulty: Medium
- Occasion: Streetwear, Y2K fashion aesthetics, parties
Cheerleader Ponytail

High placement and big bounce are the whole idea here, so the ponytail sits as high as you can comfortably get it and the tail has volume right at the base. A stiff ribbon bow finishes the look and helps keep everything looking sharp during movement.
Secure the base firmly, then tease the ponytail right at the tie to build fullness from the side before smoothing the top layer back over it. A light mist of hairspray helps the lift stay in place without making the hair feel hard. Pin the bow into the base so it doesn’t slide as you move.
- Best for: Medium to long hair
- Texture: Straight, wavy, blowout
- Difficulty: Easy
- Occasion: Sports, cheer competitions, high-energy activities
“Clean Girl” Ponytail

A sharp middle part and a slicked-back base make this ponytail look clean and minimal, with zero flyaways when it’s done well. The finish is glossy and hydrated, which is why it pairs so easily with everyday makeup and simple outfits.
Use a boar bristle brush and a conditioning wax stick, and brush in the direction the hair naturally grows so bumps don’t form at the roots. Applying product onto the brush first helps you smooth the surface without leaving streaks. Keeping the tension even matters too, because repeated tight ponytails at the hairline can stress edges over time.
- Best for: All lengths
- Texture: Straight, wavy
- Difficulty: Medium (getting it perfectly smooth requires patience)
- Occasion: Everyday, office, errands, brunch
90s Tendril Ponytail

A mid or high ponytail with two thin tendrils left out at the hairline softens the whole look right away. It’s a small change, but it makes the face feel more framed and takes the edge off a tightly pulled-back style.
Choose tendrils that are thin enough to look light, but not so thin they disappear. Pull them out before you tighten the ponytail so the base stays smooth, then style them last with a straightener or a slight bend. A tiny amount of smoothing cream keeps them piecey without turning stringy.
- Best for: Medium to long hair
- Texture: Straight, wavy
- Difficulty: Easy
- Occasion: Casual wear, nostalgic fashion, dates
60s Retro Flip
A smooth ponytail with a bold upward flip at the ends gives you that classic 60s finish, where the tail curves into a distinct “J” shape. It looks polished and slightly prim in a way that feels fresh again, especially with simple makeup and a clean outfit.
Keep most of the tail straight, then curl only the last two inches upward with a large-barrel iron and let it cool so the curve holds. Smooth the surface lightly so the flip stays crisp rather than fluffy. Collarbone to armpit length tends to be ideal here because the flip lands in the right spot.
Natural Hair and Protective Ponytails
For Type 3 and Type 4 hair, ponytails should feel secure, not painful. Keeping moisture in the hair and keeping tension reasonable are the two big priorities, because repeated tight bases can put stress on the hairline over time.
Pineapple
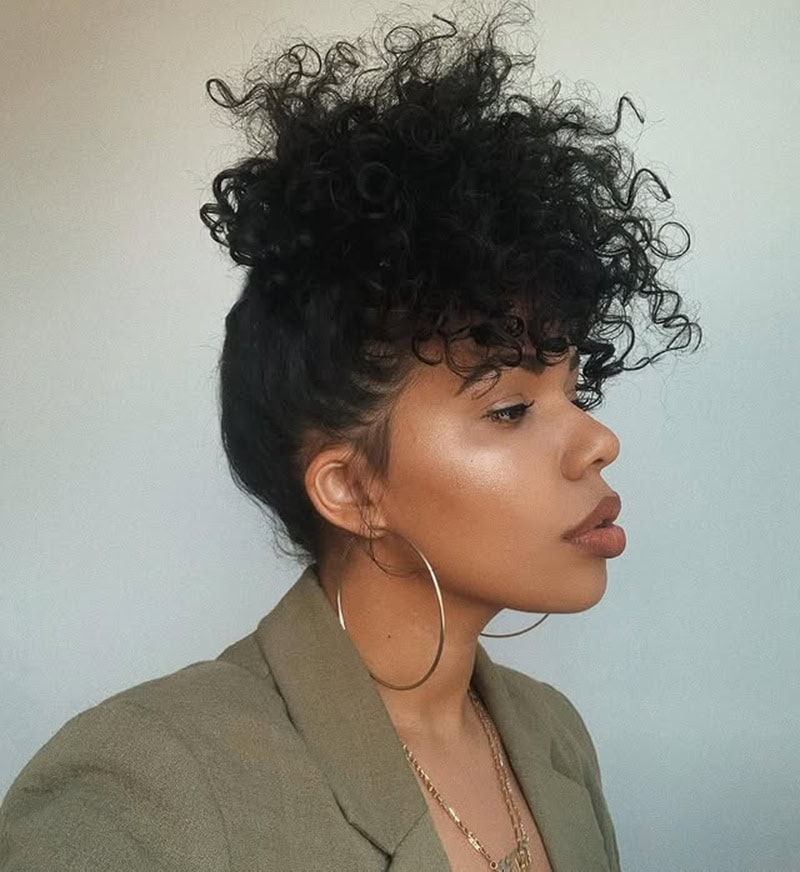
Gather curls high at the front and crown and you get that tall, voluminous shape that doubles as a faux-bang. It started as a nighttime method to protect curl definition, but it works just as well during the day because it keeps the curls lifted and the face open.
Use a satin scrunchie and keep the tie loose so the curls aren’t crushed and the scalp stays comfortable. In the morning, a little water and curl cream will refresh the front pieces, then fluff the roots with your fingertips to bring the shape back. If the scalp feels sore, loosening the pineapple is the better call.
- Best for: Medium to long hair
- Texture: Curly (Type 3), Coily (Type 4)
- Difficulty: Easy
- Occasion: Sleep protection, casual, everyday wear
Afro Puff

Gather natural hair back without stretching out the coils and the puff blooms into a rounded, full shape that’s beautiful and simple. It’s a great option for shorter to medium lengths because you get a big impact without needing extra hair.
An adjustable method, like a shoelace, puff cuff, or stretched headband, lets you tighten gradually and protect the hairline. Mist the hair lightly, apply a moisturizing leave-in, then smooth the perimeter only where needed with gel. Let the puff stay full and airy instead of compressing it down.
- Best for: Short to medium natural hair
- Texture: Coily, Kinky (Type 4)
- Difficulty: Easy
- Occasion: Everyday, work, formal (when accessorized)
Sleek Extended (Genie) Ponytail

Molding natural hair flat into a small, secure base and then attaching a long extension gives you that dramatic “genie ponytail” effect. The head shape looks smooth and sleek, while the ponytail length becomes the main feature, whether you go straight, wavy, or braided.
Getting the base right matters because the extension adds weight. Molding in thin layers helps the hair lay flat without needing excessive pulling, then the extension should be anchored so tension is distributed across the base rather than concentrated at the edges. Removal should also be gentle, because yanking at the root is where damage happens.
- Best for: All lengths of natural hair capable of making a tiny bun
- Texture: Coily/Kinky (molded flat) with straight/wavy extensions
- Difficulty: Advanced (requires molding and extension work)
- Occasion: Night out, birthdays, high-glam events
Drawstring Ponytail

Slick the natural hair into a small bun, pop the drawstring ponytail over it, tighten, and you’re done. It’s one of the fastest ways to get a polished ponytail while keeping your own hair protected underneath.
Keep the base bun smooth, moisturized, and not overly tight, then make sure the comb inside the hairpiece feels secure without scraping the scalp. Tighten the drawstring just enough to hold, since over-tightening can cause discomfort quickly. A satin scarf wrap for a few minutes helps set the base and keeps the perimeter smooth.
- Best for: Short to medium natural hair
- Texture: Matches the natural texture or desired extension look
- Difficulty: Easy
- Occasion: Quick styling, everyday, professional settings
Stitch Braid / Cornrow Ponytail

Sharp parting and stitch braids pulled back into one ponytail give a very clean, long-wear finish, especially on coily and kinky hair. The lines stay crisp, the base stays secure, and the ponytail can be braided long for a protective style that lasts.
This really does require a skilled braider, because the parting has to be precise and the tension needs to be consistent without being too tight. Ask for comfort at the hairline from the start, because soreness is a sign the braids are pulled too hard. Keeping the scalp lightly oiled and gently cleansed helps the style stay fresh while you wear it.
- Best for: All natural hair lengths
- Texture: Coily, Kinky (holds the braids perfectly)
- Difficulty: Highly Advanced (requires a skilled professional braider)
- Occasion: Vacations, long-term protective styling, gym
Loc Ponytail

Gathering locs into a ponytail looks simple, but the weight changes how you secure it. When it’s done well, it’s comfortable, stays put, and shows off the thickness and texture of the locs beautifully.
Regular elastics can snap or create pressure in one spot, so a thick hair bungee is usually a better option. Wrapping two locs around the base and tying them can also spread tension more evenly. If the ponytail feels heavy, dropping the placement slightly lower often makes it much more comfortable.
- Best for: Medium to long dreadlocks
- Texture: Locs
- Difficulty: Easy
- Occasion: Everyday, gym, professional
Loc Petal Ponytail

Fold and pin the ends of locs around the ponytail base and you get a beautiful “petal” effect that looks dressy without adding extra hair. It’s a great formal option because it keeps the shape close and controlled while still showing off the loc texture.
Work around the base in a circle and keep each folded loc similar in size so the petals look even. Use strong pins that can handle the thickness and anchor them into the base securely. Balance matters too, because if one side gets heavier the style can start to lean or slump.
- Best for: Medium dreadlocks
- Texture: Locs
- Difficulty: Advanced
- Occasion: Weddings, formal galas, red carpet
Box Braid / Twist Ponytail

When the hair is already in box braids or twists, a ponytail can look incredibly full, but the weight needs to be managed. The base should feel secure without pulling, because heavy braided ponytails can stress the hairline if they’re tied too high or too tight.
A heavy-duty elastic works, but a silk scarf is often kinder because it spreads pressure and reduces snagging. Mid or low placement is usually more comfortable for longer installs. On days the edges feel tender, loosening the ponytail and keeping the perimeter moisturized can help you avoid unnecessary stress.
- Best for: Hair styled in braided/twisted extensions
- Texture: Braids/Twists
- Difficulty: Medium (due to weight management and tension)
- Occasion: Everyday protective style, gym, activewear
Sleek Edges (Swoop) Ponytail

Here the ponytail can be simple, and the focus stays on the hairline. Edges are smoothed and shaped into swoops and curves, which frames the face and gives a polished finish even when the ponytail itself is basic.
Use a strong edge control gel and a fine edge brush, then set the edges with a scarf so they dry flat and smooth. Giving the hairline regular breaks is important, because daily heavy slicking paired with tight bases can stress fragile edges over time. Keeping the perimeter moisturized and keeping tension comfortable are the best long-term habits.
- Best for: All lengths
- Texture: Coily, Kinky, Curly (Type 3 & 4)
- Difficulty: Medium (requires artistic edge-laying skills)
- Occasion: Parties, formal, everyday glam
Parts, Bangs, and Face-Framing
Swoop Ponytail

A deep side part with a dramatic sweep across the forehead gives this ponytail that old-Hollywood feel, especially when the front section tucks neatly behind the ear before joining the ponytail. Hiding one temple changes the face shape in a flattering way and brings more attention to the eyes.
Directional blow-drying helps the swoop lay flat, then a smoothing cream and a comb keep it controlled without looking stiff. The diagonal line also works well for larger foreheads because it breaks up the space naturally. Leaving one ear exposed is a nice bonus because it makes earrings stand out.
- Best for: Medium to long hair; larger foreheads
- Texture: Straight, sleek, relaxed
- Difficulty: Medium
- Occasion: Weddings, galas, sophisticated events
Middle Part Ponytail

A crisp center part creates symmetry immediately, which is why it can make cheekbones look more defined and the face look more balanced. It’s simple, but it has a very clean effect, especially when the base is smooth and the ponytail is neatly secured.
Make the part straight, then smooth both sides back evenly so the base doesn’t twist. Pressing product over the surface with your palms after brushing helps keep it sleek without looking wet. Keeping the ponytail base neat and the lengths polished makes a big difference, particularly on straight hair where frizz shows quickly.
- Best for: All lengths, symmetrical face shapes
- Texture: Straight, wavy, sleek
- Difficulty: Easy
- Occasion: Everyday, professional, high-fashion
Slicked-Back (No Part) Ponytail

Pushing all the hair straight back without a part fully opens the face and gives a slight lifted effect around the forehead and temples. It’s a great option for workouts or sleek evening looks, and it tends to look best when the hairline is fairly full.
Even tension keeps it looking smooth, so tighten in small pulls and check both sides as you go. Applying gel with a brush helps you smooth without leaving lumps of product at the roots. If the hairline is sparse, a softer part or a slightly looser base can look more flattering and feel more comfortable.
- Best for: Medium to long hair, thick hairlines
- Texture: Straight, wavy, curly
- Difficulty: Medium (requires smooth, even tension)
- Occasion: Gym, intense physical activity, sleek evening wear
Ponytail with Curtain Bangs

Leaving curtain bangs out while tying the rest back gives you the best kind of softness around the face. The ponytail pulls everything up and away, while the bangs curve at the cheekbones and make the face look more balanced, especially on round and square shapes.
Blow out the bangs with a round brush and direct them away from the face so they lift at the root and fall softly at the cheek. Once the bangs are set, tie the ponytail and keep the base fairly clean so the front stays the focus. A light smoothing cream on the bang ends helps them stay separated without frizzing.
- Best for: Layered hair cut with curtain bangs
- Texture: Straight, wavy
- Difficulty: Easy
- Occasion: Casual, dates, everyday soft glam
Ponytail with Blunt Bangs

Pairing a sharp blunt fringe with a ponytail creates a strong contrast that feels edgy and chic at the same time. The bangs draw a clean line across the face, while the ponytail keeps everything else pulled back, which makes the haircut itself stand out.
Keep the bangs smooth and the ponytail base tidy, because bumps behind a blunt fringe can make the whole style look messy. A quick pass with a flat iron helps, then a tiny amount of serum on the ends keeps them sitting neatly without splitting. Placement is personal here: high feels bolder, low feels more classic.
- Best for: Hair with a pre-cut blunt fringe
- Texture: Straight
- Difficulty: Easy
- Occasion: Art shows, casual, fashion-forward looks
Ponytails with Accessories
Scrunchie Ponytail

Swapping a regular elastic for a scrunchie changes both the look and how the ponytail treats your hair. The fabric reduces friction, so there’s less snagging and less breakage, and it also adds a softer, more casual vibe.
Silk or satin scrunchies are the gentlest choice, especially if you wear ponytails often or sleep in them. Keep the placement comfortable, then let the scrunchie add a bit of softness around the base. Velvet or heavier satin scrunchies can also make the style feel a little dressier without changing the ponytail itself.
- Best for: All lengths and densities
- Texture: All textures
- Difficulty: Easy
- Occasion: Sleep styling, gym, casual, lounging
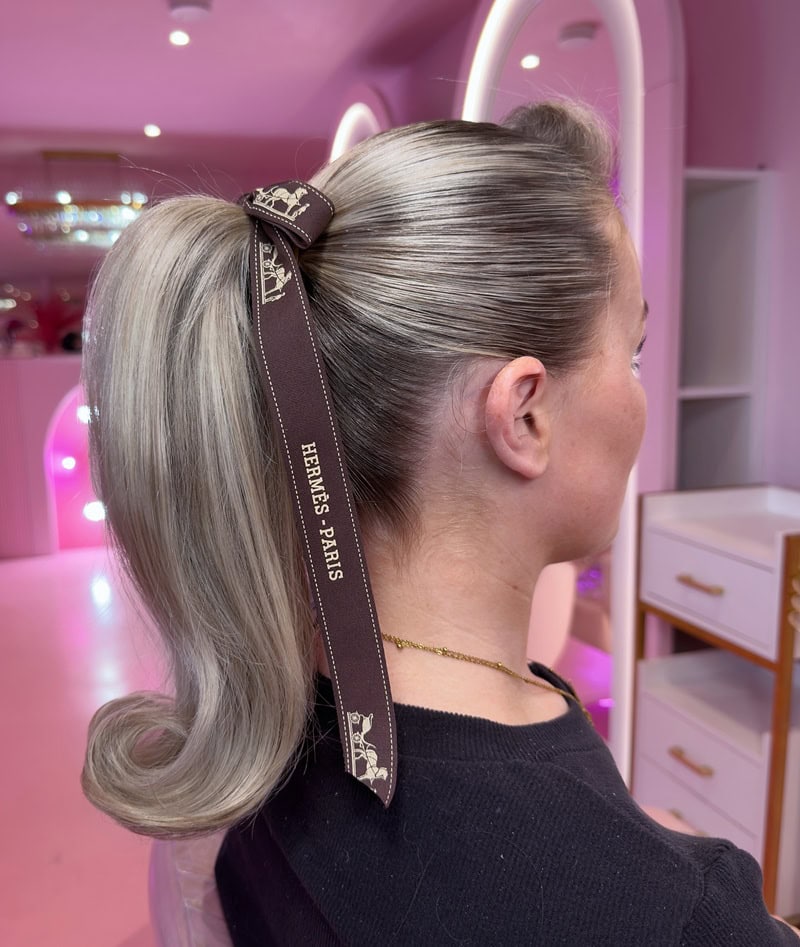
Ribbon / Bow Ponytail

Tie a ribbon bow over the hair tie and a plain ponytail instantly looks dressed up. It’s sweet and romantic, and it works especially well when the ponytail itself is simple and smooth so the bow gets to stand out.
Choose a ribbon with a bit of structure, like velvet, lace, or satin, so the bow holds its shape. Securing the knot with a discreet bobby pin underneath helps it stay put all day. Keeping the ponytail texture clean also prevents the bow from getting lost in too much volume or frizz.
- Best for: Medium to long hair
- Texture: Straight, wavy, curly
- Difficulty: Easy
- Occasion: Brunch, holidays, romantic outings, spring events
Scarf Ponytail

Knotted over the tie, a scarf adds color, pattern, and movement without much effort. The fabric tails trail into the ponytail, which can also make the hair look thicker and longer, especially if the scarf has contrast.
Silk and chiffon drape nicely and tend to be gentler on the hair. Tie the scarf firmly enough that it won’t slip, then let the tails fall naturally rather than forcing them into place. If your ponytail is on the finer side, choosing a printed scarf can add visual fullness right away.
- Best for: Medium to long hair
- Texture: Straight, wavy, curly
- Difficulty: Easy
- Occasion: Vacations, summer picnics, boating, beach
Metal Cuff Ponytail

Snapping a metal cuff over the hair tie makes a ponytail look instantly more polished, especially on a low ponytail. It covers the elastic completely, so the base looks finished in a very clean, modern way.
Keeping the hair smooth helps the cuff look crisp, so a tiny amount of serum on the surface can be useful. Make sure the cuff size matches the thickness of your ponytail base, because a cuff that’s too tight can pinch and a cuff that’s too loose can slide. For the most secure hold, place it directly over the elastic rather than lower on the ponytail.
- Best for: Medium to long hair
- Texture: Sleek straight
- Difficulty: Easy
- Occasion: Office chic, high-fashion, modern minimalist events
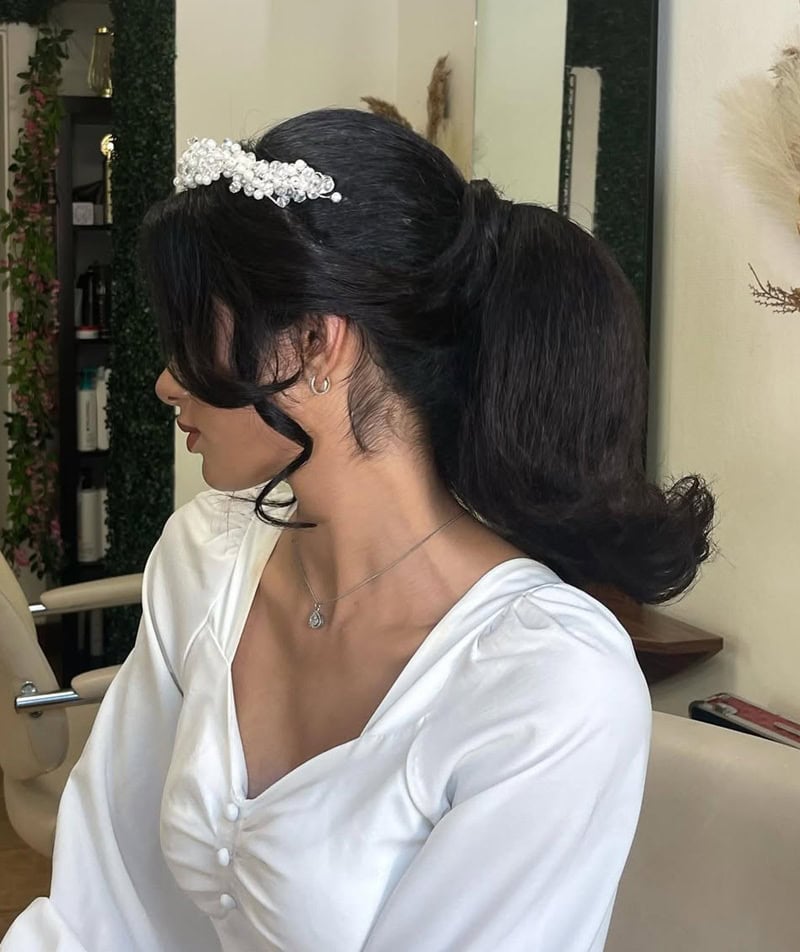
Pearl / Gemstone Ponytail

Adding pearls or rhinestones to a ponytail turns it into event hair without changing the base style much. Placing them along the roots, the part line, or scattered through the tail gives a soft sparkle that looks great under lights and in photos.
Use a skin-safe adhesive that dries clear and doesn’t flake, then place flat-backed pieces with tweezers so you have control. Keep embellishments away from the eyes, and avoid getting glue on sensitive skin if you’re prone to irritation. For removal, soften the adhesive with an oil-based remover and slide pieces off gently instead of pulling.
- Best for: Medium to long hair
- Texture: Sleek straight or bouncy curls
- Difficulty: Advanced (tedious, precision application process)
- Occasion: Festivals (Coachella), New Year’s Eve, avant-garde parties
A great ponytail is never an accident. Once you understand placement, tension, and finish, you can make the same simple style look sharper, softer, more lifted, or more relaxed in minutes. Save a few favorites from each section, then rotate them based on your outfit, your hair texture, and how your scalp feels that day. Your hairline will thank you, and your ponytail will look polished from every angle.