
Getting a beautiful Bantu knot style is a dream for many Black women. As gorgeous as it looks, it can be difficult to do at home, especially when you are doing it all by yourself.
When the style has curved partings, a small C-shaped cornrow, raised knots, slim side braids, and coiled ends, it adds even more beauty to the look, but the difficulty level goes way up.
When Adeola Rebecca’s Bantu knot hairstyle went viral on Instagram, many women loved the look and wanted to try it. But without a proper tutorial, the curved parts, C-shaped cornrow, raised knots, slim side braids, and coiled ends were hard to figure out.
You can see the viral Bantu Knots Braid style here.
So, for this week’s HairstyleCamp Originals tutorial, we brought Adeola to break down the look. This time, she skips the beads and finishes the braids with soft coiled ends, keeping the style beautiful but a little more practical for daily wear.
In this article, we cover the details from the video so you can follow along more easily, from creating the base and shaping the knots to keeping everything neat without making the style too tight.
What You’ll Need
- Braiding hair extension
- Rat-tail comb and brushing comb
- Braiding gel
- Hair thread for tying the roots
- Hair clips, or hair bands
- Scissors for trimming excess thread
- Towel and a heat-safe bowl or cup for setting the coiled ends
- Optional: beads, if you want to copy the viral version instead of coiled finish
How to Do the Viral Bantu Knot Hairstyle
This style is created with many small details, from the curved parts to the thread-secured bases and coiled ends. Follow each step carefully so the final look stays neat, balanced, and comfortable.
Step 1: Section the Hair Into Three Main Sections
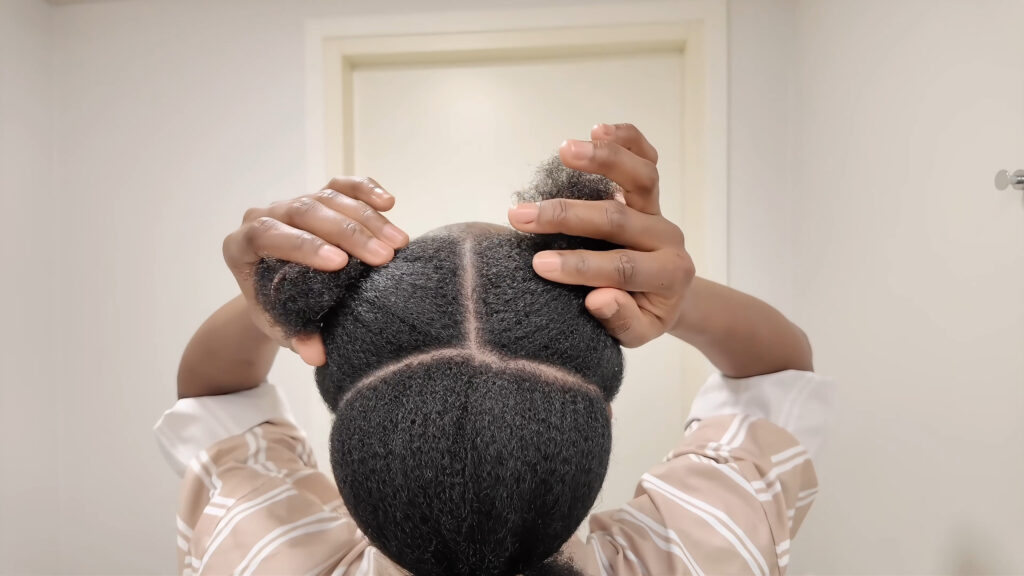
Part the hair into three broad zones first: two front sections and one bigger section at the back. Clip or band away any hair you are not working on so your partings stay clean. This first map does not have to be decorative yet; it simply gives you control before you start drawing the curved design.
Comb each working area before tying or braiding. On natural hair, especially dense or frizz-prone hair, skipping this step can make the roots puffy and the knots harder to place later.
Step 2: Divide the Front into Three Sections
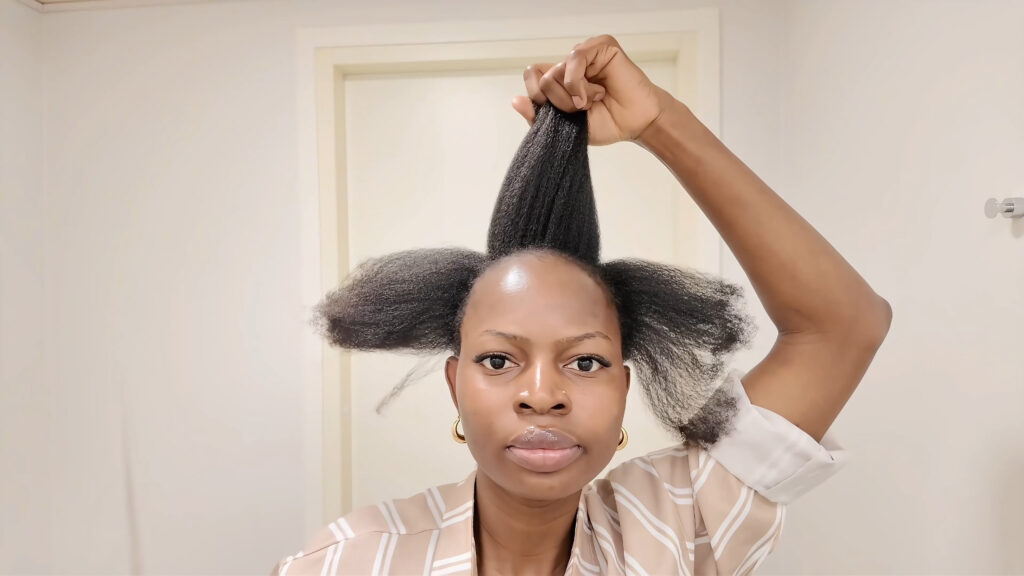
Comb the two front sections together and divide them into three smaller parts. The middle front area is where the tiny C-shaped cornrow detail will sit, so keep your parting comb close and use clips to keep loose hair from falling into the line.
A master-stylist tip: do not rush the parting. This style gets its “viral” look from the shape of the sections as much as from the knots themselves.
Step 3: Trace a Small C-Shaped Part Around the Center
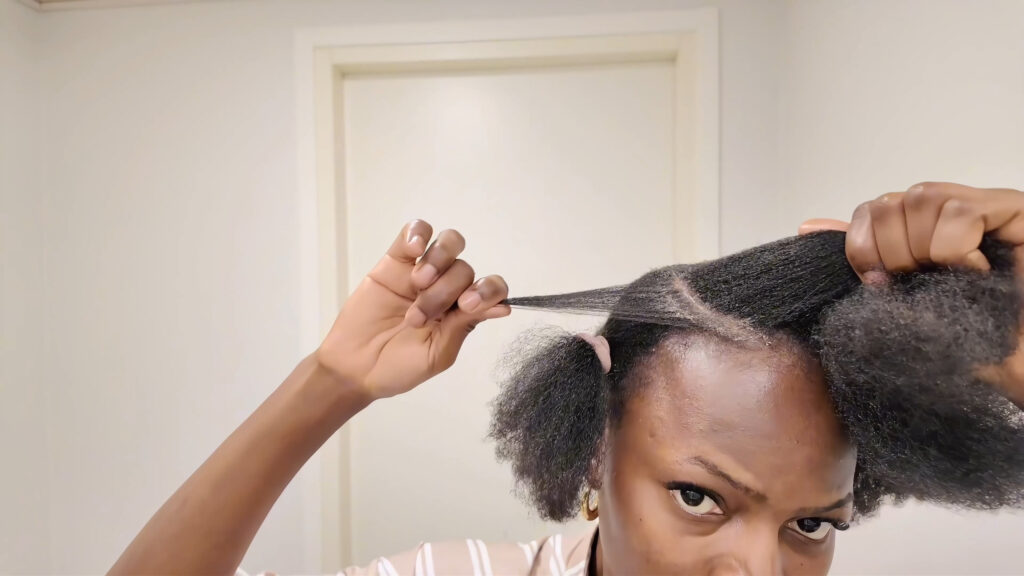
Apply braiding gel directly along the part you want to clean up, then use the tail of your comb to form a small C-shaped cut near the center front. This creates the slim curved detail that wraps around the center knot.
Think of the gel as a parting aid, not a glue. Use enough to sharpen the curve and control flyaways, but avoid packing the roots with product.
Step 4: Weave the C-Cut Halfway, Not All the Way Down

Weave the C-shaped section with your natural hair only. The braid should be neat and firm enough to lie flat, but not so tight that it pulls at the scalp. Leave the ends loose instead of braiding the section completely to the end.
That halfway stop matters. It keeps the accent braid slim near the scalp while leaving enough hair to blend into the front section when you create the base for the Bantu knot.
Repeat step 3 and 4 on the other side of the center part also.
Step 5: Tie, Twist, and Secure the Center and Side Sections
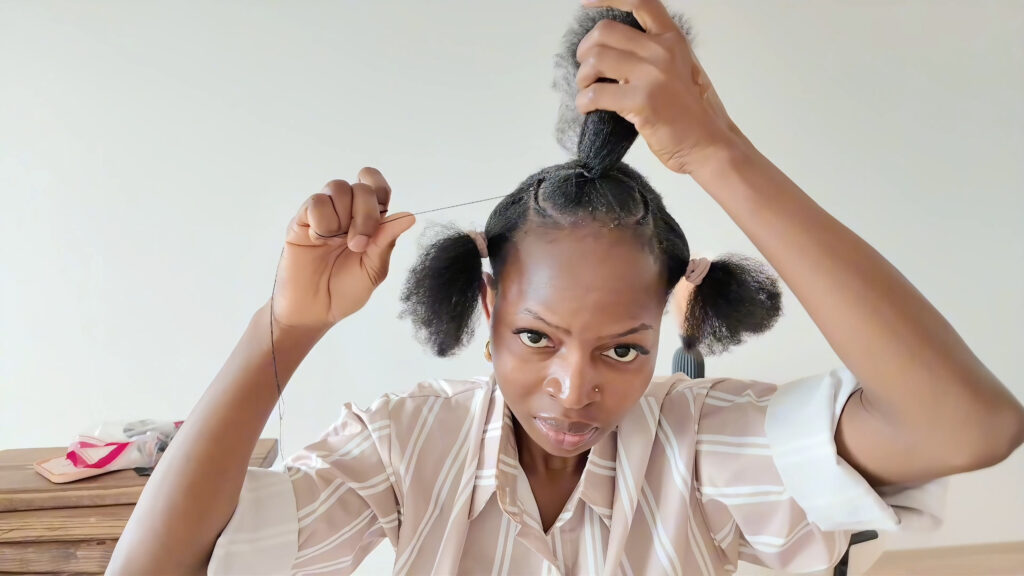
Bring the center front section together. Apply braiding gel around the base, then wrap thread around the roots and knot it. Cut away any excess thread once the base feels secure.
This tied base is important, especially if your natural hair is fluffy, frizzy, or dense. Without a firm base, the braid can loosen and the Bantu knot may not sit in the center.
Note: The thread should secure the base without pain. If it feels too tight, loosen it and retie the section.
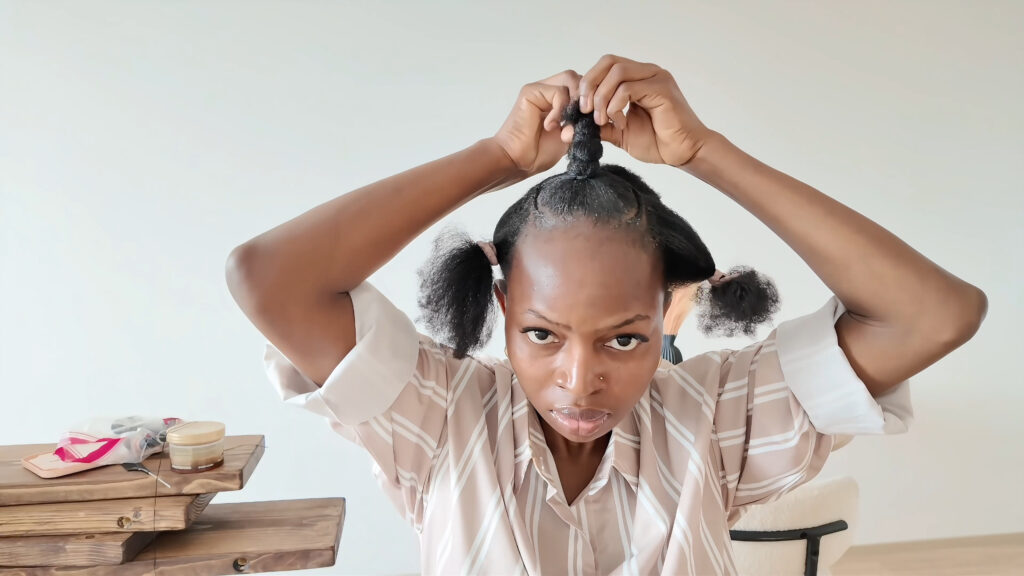
After tying the base, twist the loose hair upward from the base and secure the end.
Next, choose one side and part a thin section near the ear for the slim side braid. Leave that thin section loose for now.
Take the larger section above it, apply braiding gel to smooth the hair, tie the base with thread, then twist and secure the hair the same way you did with the center front section. Repeat the same process on the other side.
Check the tension before moving on. You should be able to move your forehead and turn your head without pain. If any base feels sharp, tight, or uncomfortable, undo it and retie it looser.
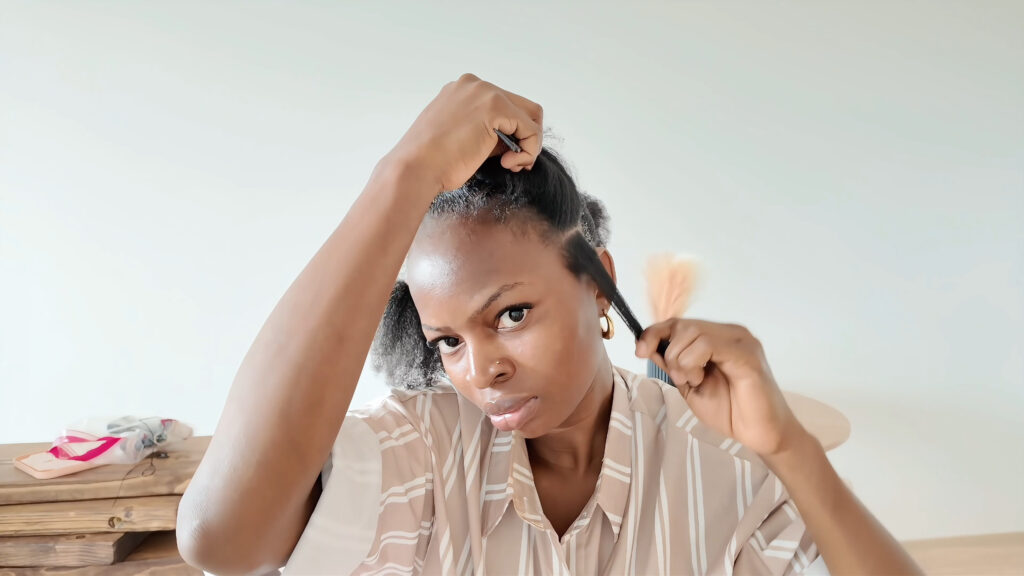
Step 6: Braid the Loose Side Sections With Extension
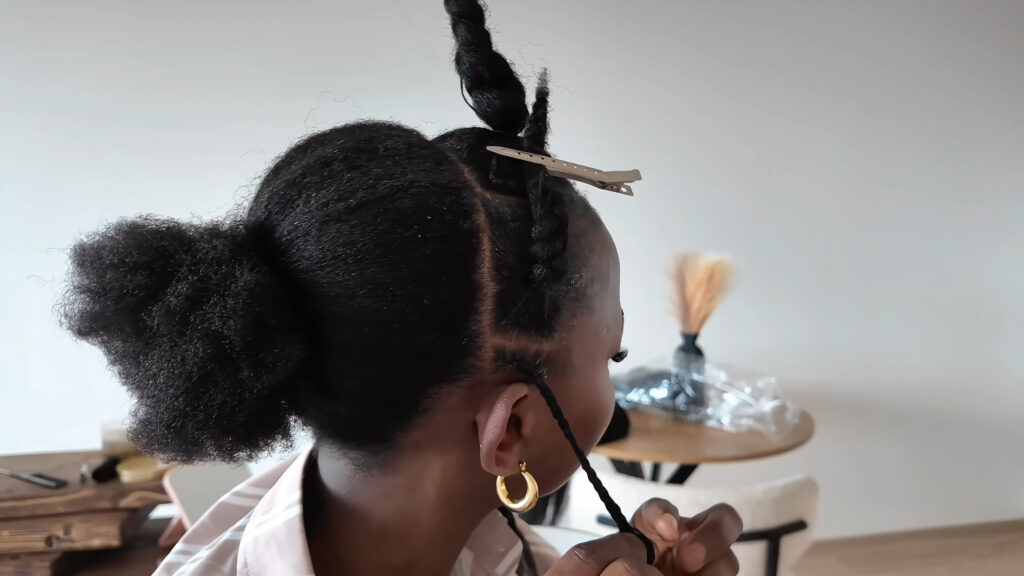
Take the thin loose section near ear and divide it into three strands. Start with a few three-strand braid stitches using only your natural hair. This gives the side braid a clean base before you add extension.
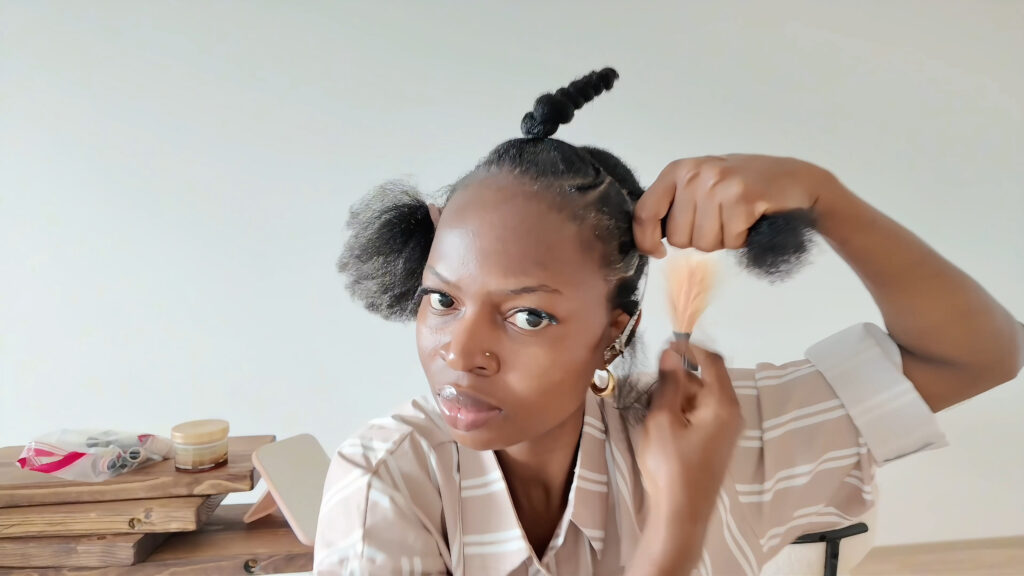
Next, take a small section of extension hair and feed it into the braid. Blend it into the braid strands as you continue braiding. Add more small sections gradually until the braid has enough length and fullness while still staying slim.
Keep the side braid thin so it frames the face without competing with the Bantu knots. Once the braid is long enough for the finished look, stop braiding and leave the remaining extension loose.
Repeat the same process on the other side. These loose ends will be shaped into coils later.
Step 7: Part, Tie, and Prepare the Remaining Sections
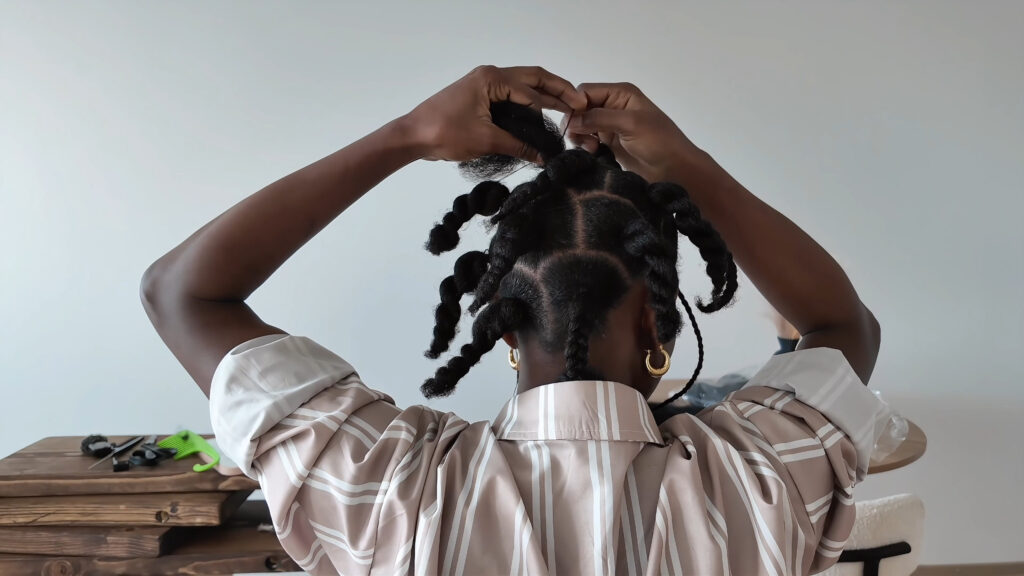
Now move into the back and sides of the head. Instead of making a strict grid, create irregular curved parts so the pattern looks soft and flowing. Apply braiding gel along each parting line to keep the sections clean before tying them.
Comb each section before tying it. This helps remove tangles and gives each Bantu knot a smoother base.
Tie each section at the root with thread, just as you did with the front and side sections. The root tie helps each knot sit upright and stay in place. If your hair tangles easily, twist or loosely braid each tied section after securing it so it stays neat while you work.
Step 8: Braid and Wrap Each Bantu Knot Section
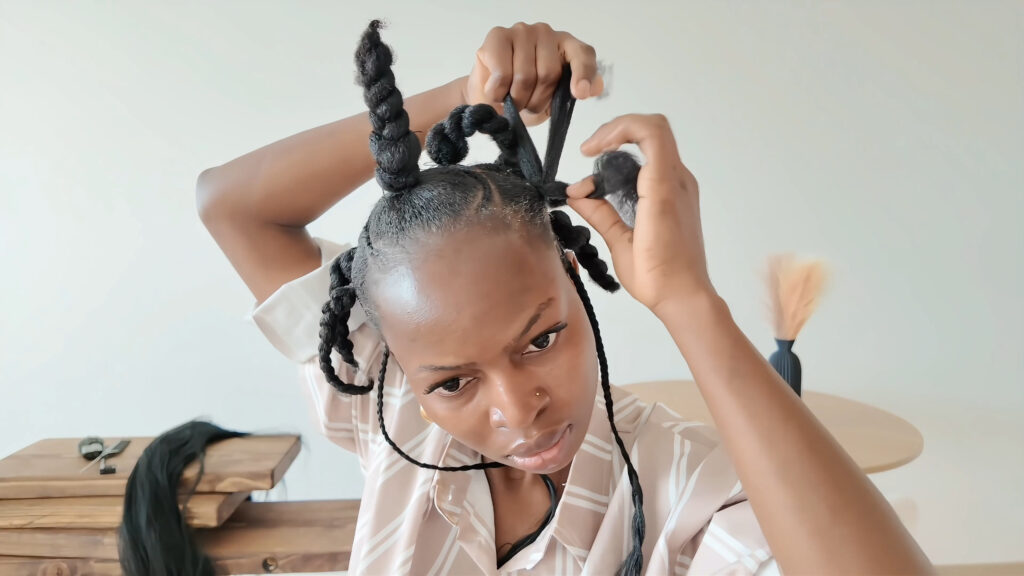
Take one tied section at a time. Untwist it, comb it, divide it into three strands, and start braiding with your natural hair first. Once the braid feels stable, feed in extension as you continue braiding.
Match the amount of extension to your hair density. If your hair is fine or thin, use a smaller section of braiding hair. If your hair is thick, use a fuller section so the braid looks balanced before wrapping.
Continue braiding to the end of the hair. As your natural hair blends into the extension, use braiding gel to smooth any loose ends so they do not poke out of the braid.
Step 9: Fold and Wrap the Braid Into a Bantu Knot
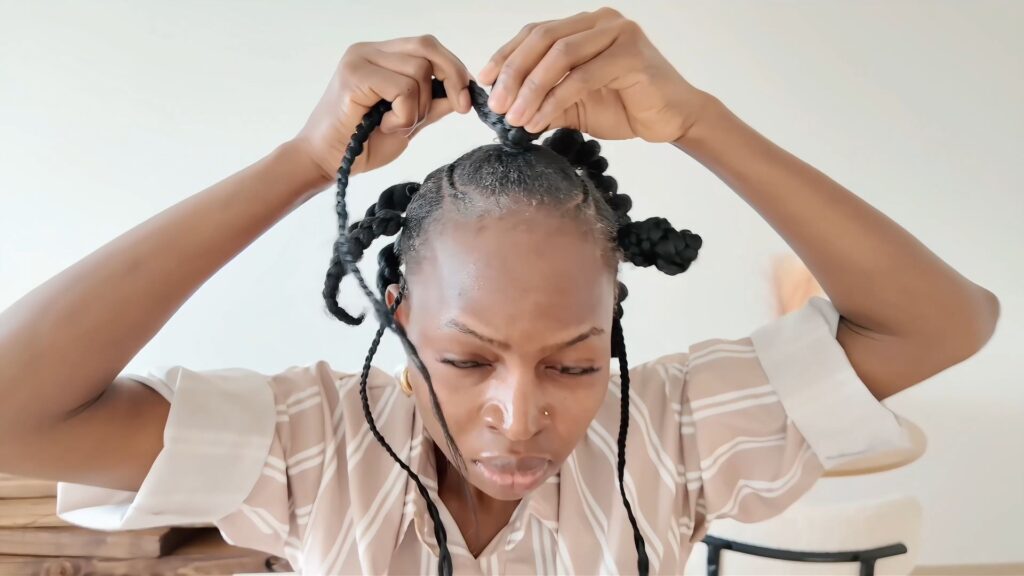
Once the braid is complete, fold it at the height you want the Bantu knot to sit. A shorter fold gives a compact knot, while a taller fold gives a more raised look.
Hold the fold steady, then wrap the rest of the braid around it from the top toward the base. Keep the wrap smooth and close, but do not pull so hard that it twists or hurts the scalp.
As you reach the end, guide the final wrap down to the root and secure it around the base. This locks the Bantu knot in place. Repeat the same braid, fold, and wrap method on every tied section.
Step 10: Finish and Set the Side Braids
The viral version used hair beads, but this recreation finishes the side braids with coils instead.
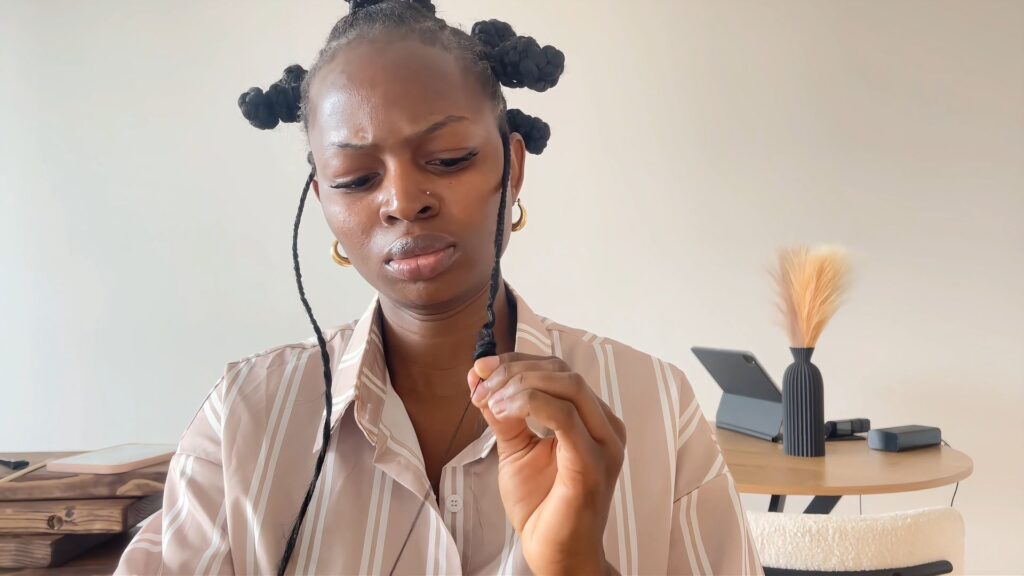
Tie the thread at the point where the side braid stops. Then wrap the thread loosely around the remaining extension hair. After wrapping, gently pull or compress the wrapped end to form the coil shape.
Tie the end securely and cut off any excess thread. Repeat the same process on the other side braid.
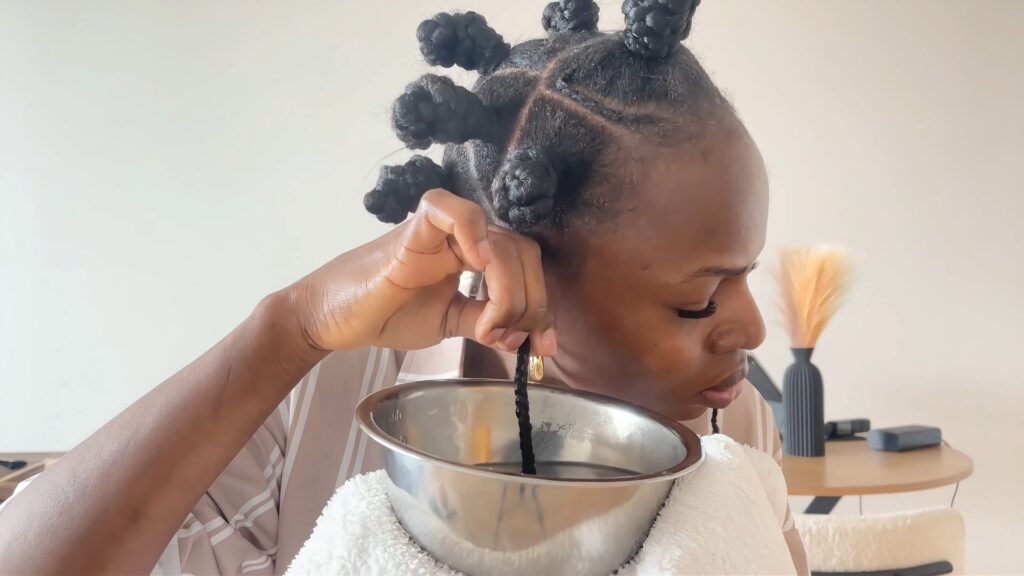
Dip only the wrapped extension ends into hot water, then blot them dry with a towel. Keep the hot water away from the scalp, face, neck, and hands.
For safety, place the bowl on a stable surface and use a towel as a barrier when dipping the ends. Do not dip the knots or natural hair roots. Only the synthetic extension ends need to be set.
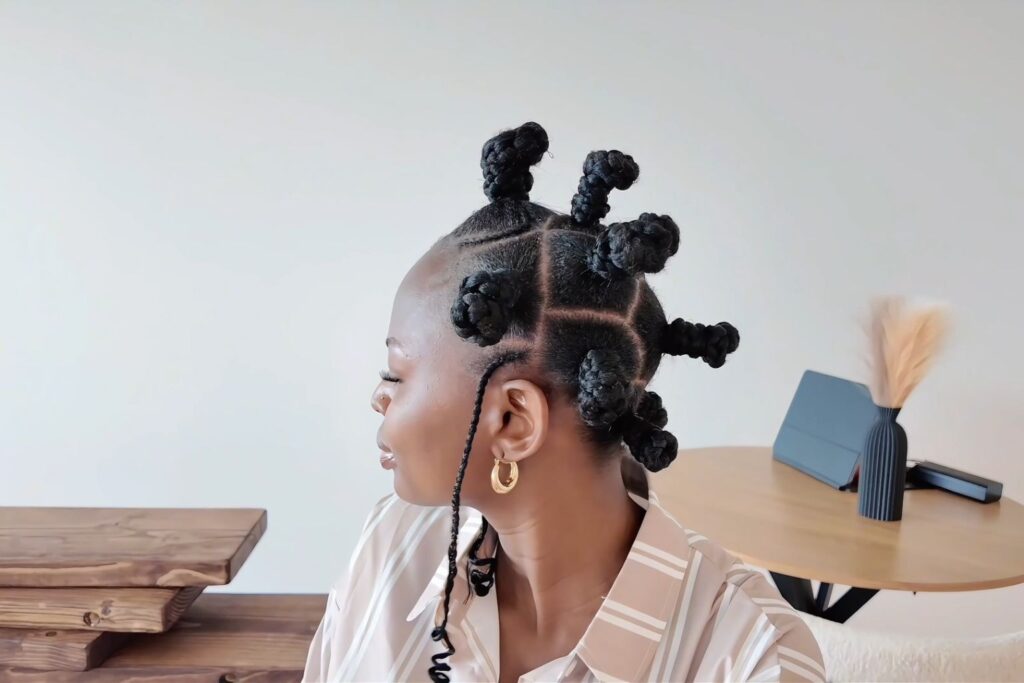
Final Look of the Bantu Knot Hairstyle
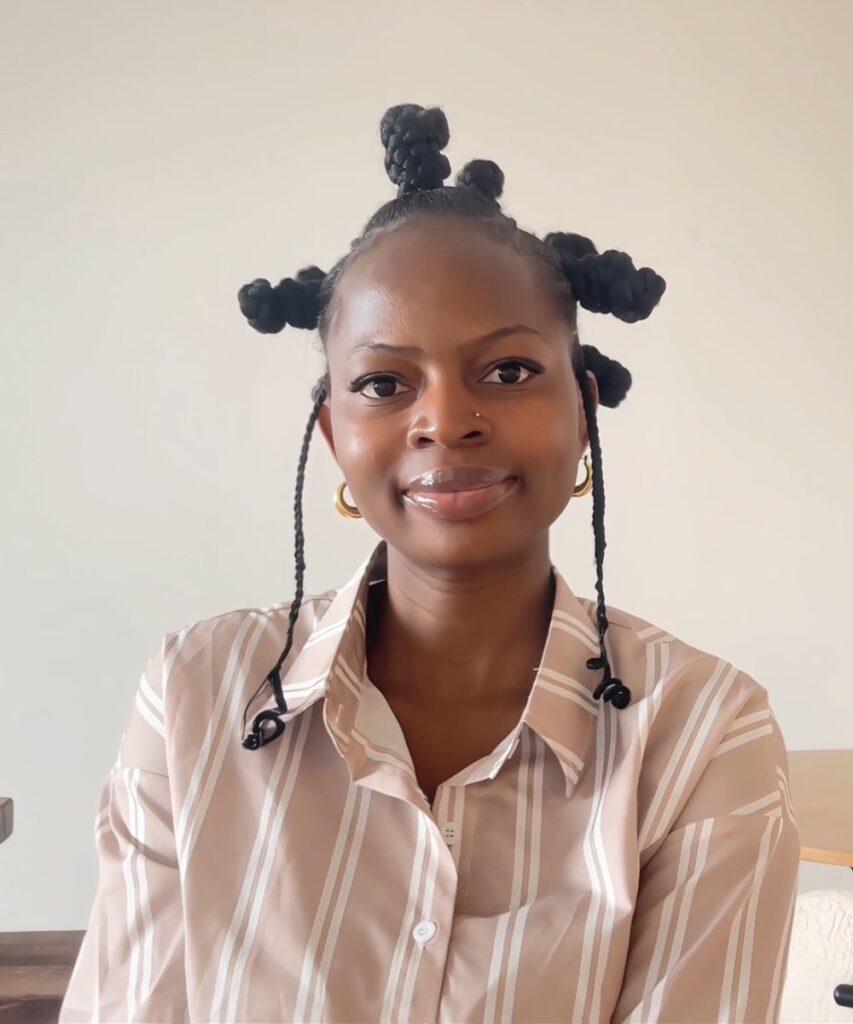
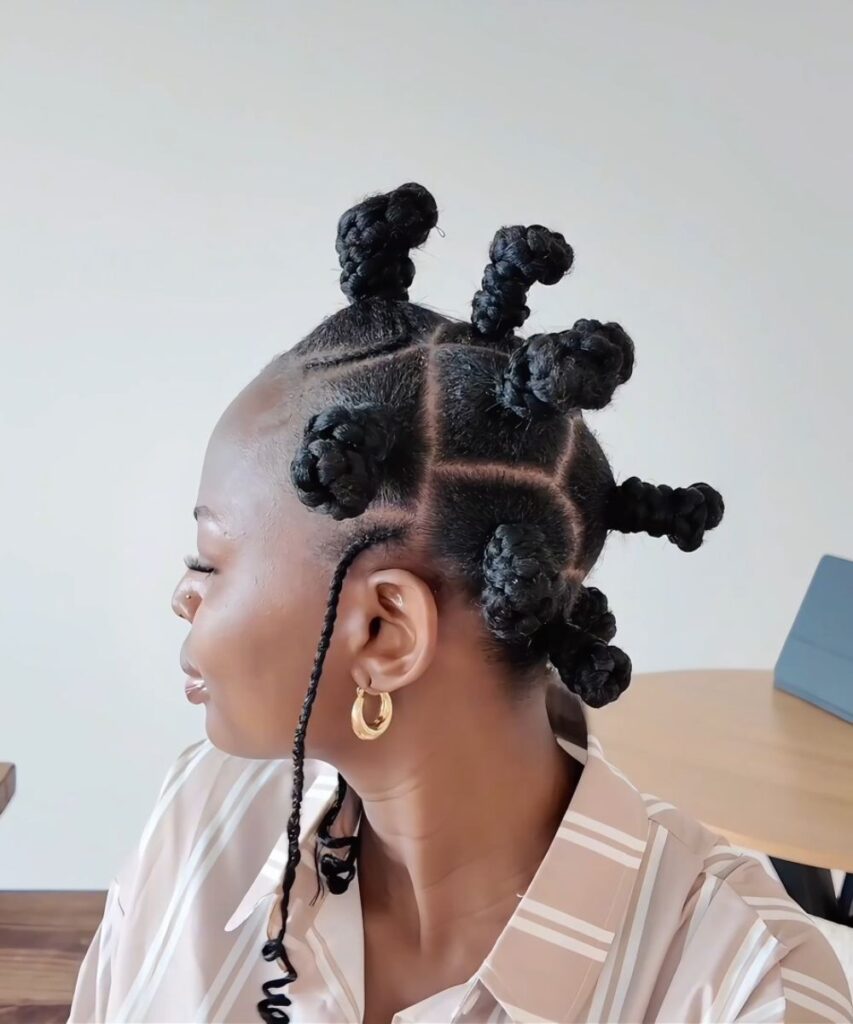
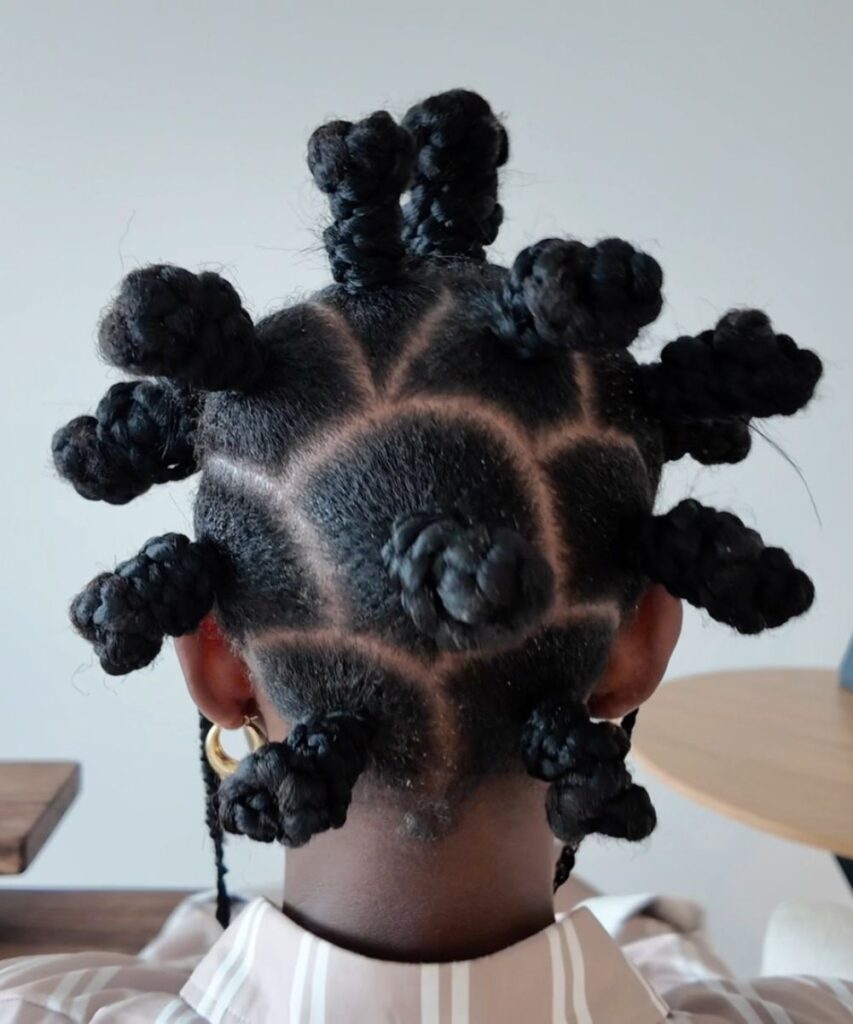
After the coiled ends are set and dried, check the hairstyle from the front, sides, crown, and back. The finished look should show raised Bantu knots, clean, curved parts, slim face-framing side braids, and soft coiled ends.
A little natural texture at the roots is normal. The style does not need to look overly slick to look neat and polished.
Pro Tips From the Stylist
- If your parts look fuzzy: add gel to the parting line and retrace with the tail of the comb. Do not smear gel over the whole section.
- If a knot feels wobbly: the root base may be too loose, the braid may be too long, or the final wrap may not have reached the root. Redo that knot before moving on.
- If your scalp hurts: loosen the thread or redo the braid. Pain is not a sign of a long-lasting style; it is a warning sign.
- If your hair is thin: use fewer extensions. Heavy extension on a small section can pull at the follicle and make the knot lean.
- If your hair is thick: use fuller extensions so the braid and knot look balanced, just as Adeola does in the tutorial.
- If the coils do not form: wrap the thread more evenly, dip only the wrapped extension ends, and let them cool before touching.
How to Maintain This Bantu Knot Style
Sleep with a satin scarf or bonnet and avoid crushing the knots too tightly while you rest. In the morning, smooth any lifted part lines with a tiny amount of gel on your fingertip or the tail of the comb. Do not keep retightening the roots; repeated tightening is one of the fastest ways to turn a beautiful style into unnecessary tension.
If you notice tenderness, bumps, itching that does not calm down, broken hairs around the hairline, or a pulling sensation when you smile or move your face, take the style down or redo the affected section looser. The best version of this look is secure, clean, and comfortable.
Final Thoughts
This Bantu knot hairstyle is all about clean sectioning, secure bases, and careful wrapping. The curved parts and raised knots give it drama, while the slim side braids and coiled ends keep the finish soft and wearable.
Take your time with the parting, keep the thread tension comfortable, and adjust the amount of extension to your own hair density. That is what makes the style look balanced and feel good to wear.