
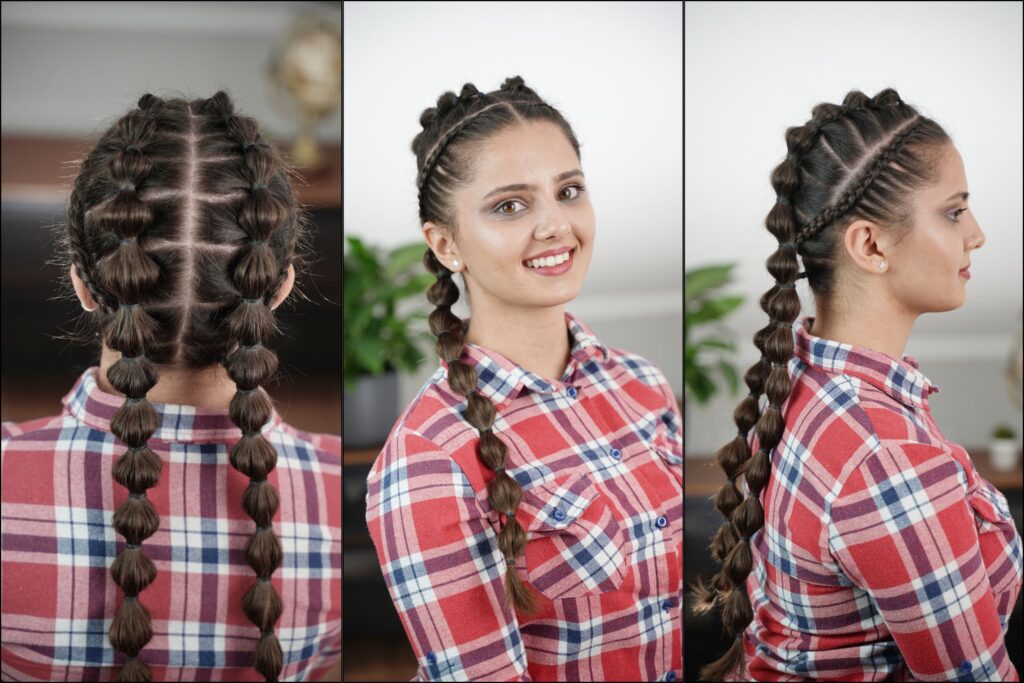
Bubble braid pigtails are beautiful, but they can look a little too simple for a party or formal event. For this HairstyleCamp Originals look, I added lace braids to both sides of the pigtails to make the style feel more special.
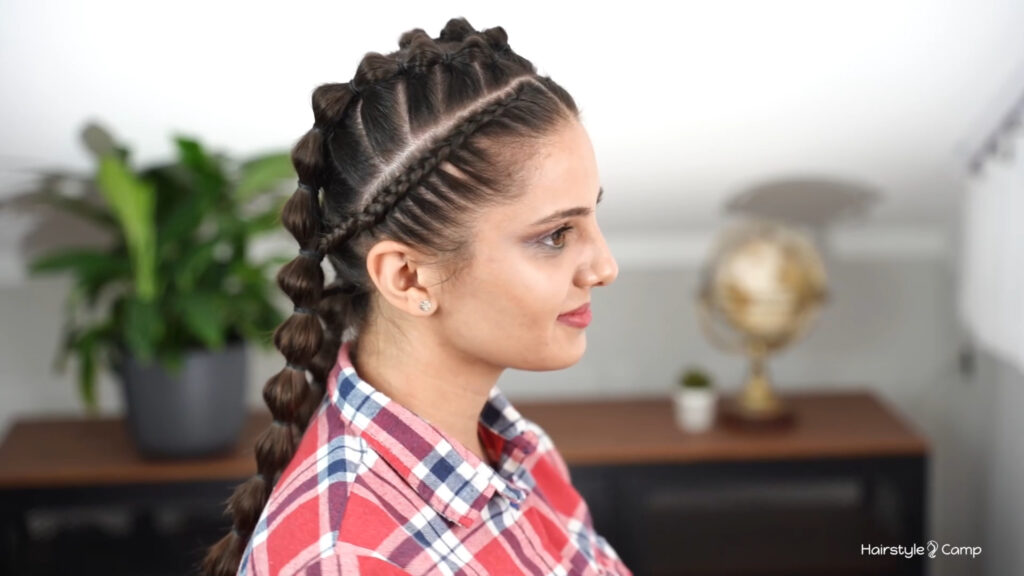
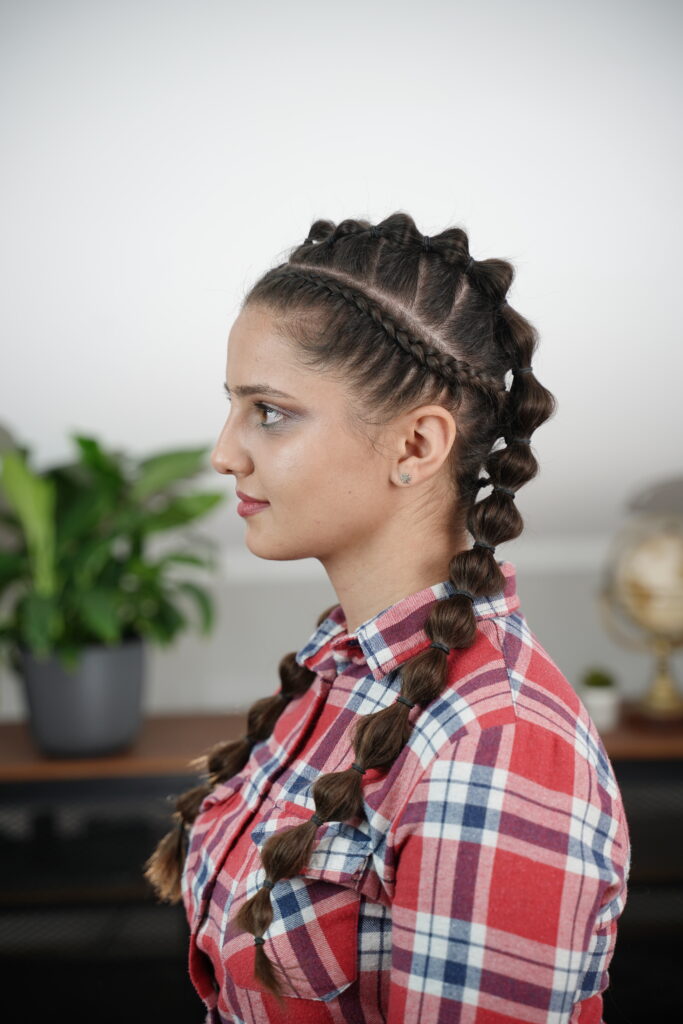
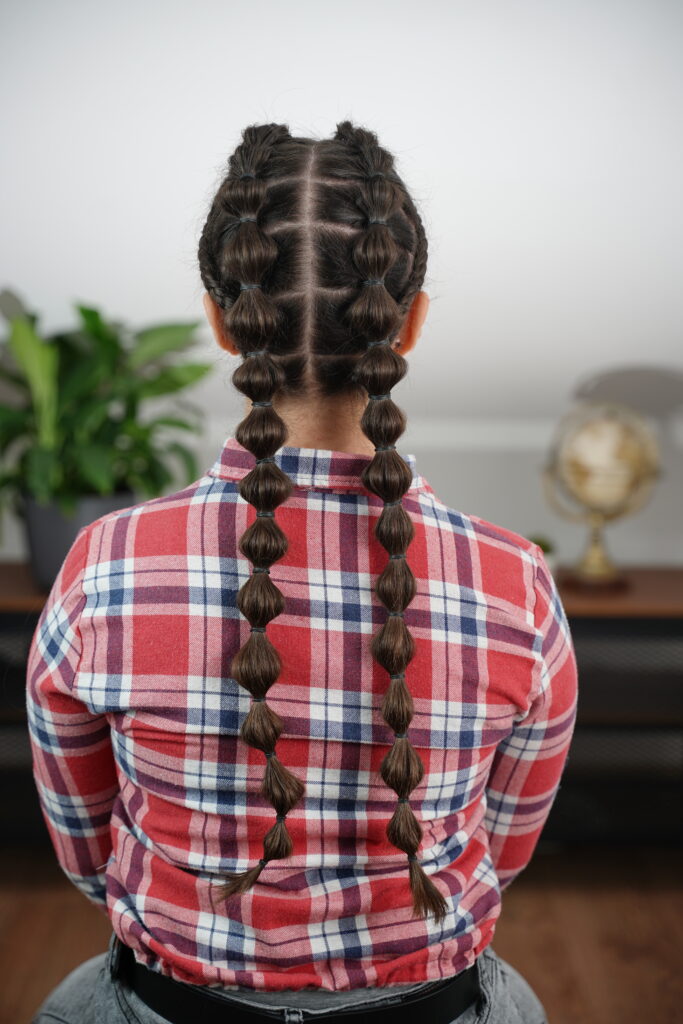
The lace braids add shape and detail, while the double bubble braids keep the style playful. The clean center part, neat scalp partings, and straight side sections make the hairstyle look gorgeous.
Below, I’ll break down each step from my tutorial video so you can follow along easily at home.
Tools and Accessories You’ll Need
The most important accessories for this style are mini rubber bands. You will use them again and again to create each bubble and connect the sections neatly.
Once the lace braids and bubble sections are underway, running out of rubber bands can leave the hairstyle unfinished. Depending on the length and thickness of the hair, you may need quite a few, so keep plenty close before you start.
For this style, you’ll need:
- A hairbrush
- A rat-tail comb
- One or two claw clips
- A pack of 100 small hair elastics
- Optional: light styling cream, smoothing serum, or flexible-hold hairspray for flyaways
What to Know Before Styling
This hairstyle works best on medium to long hair because the pigtails need enough length to create several bubbles below the nape.
The lace braid in this hairstyle is formed like a Dutch braid, so the outside strands cross under the middle strand. The difference is that you only add hair from one side. Here, the added hair comes from the face-side edge of the section, which helps the braid sit neatly along the side of the head.
Try to keep the tension firm but gentle. The elastics need to hold each bubble in place, but the style should still feel comfortable. If the scalp feels tight around the hairline, temples, or nape, loosen the section before moving on.
I have broken the full tutorial into 8 easy steps below, so you can follow the lace braids and bubble braid sections in the same order shown in the video.
How to Do Double Bubble Braids With Lace Braids
There are two main elements to this style: first, creating the lace braids along both sides of the head, and then forming the double bubble braid shape.
To make it easy to follow, I have broken the full tutorial into detailed steps below.
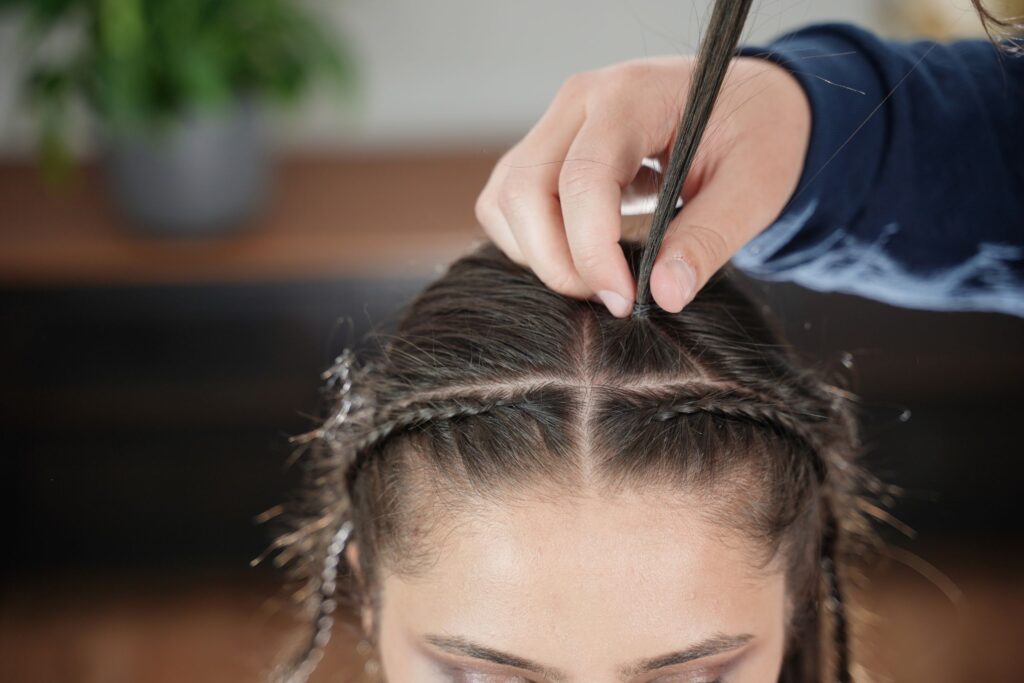
1. Brush the Hair and Make a Clean Middle Part
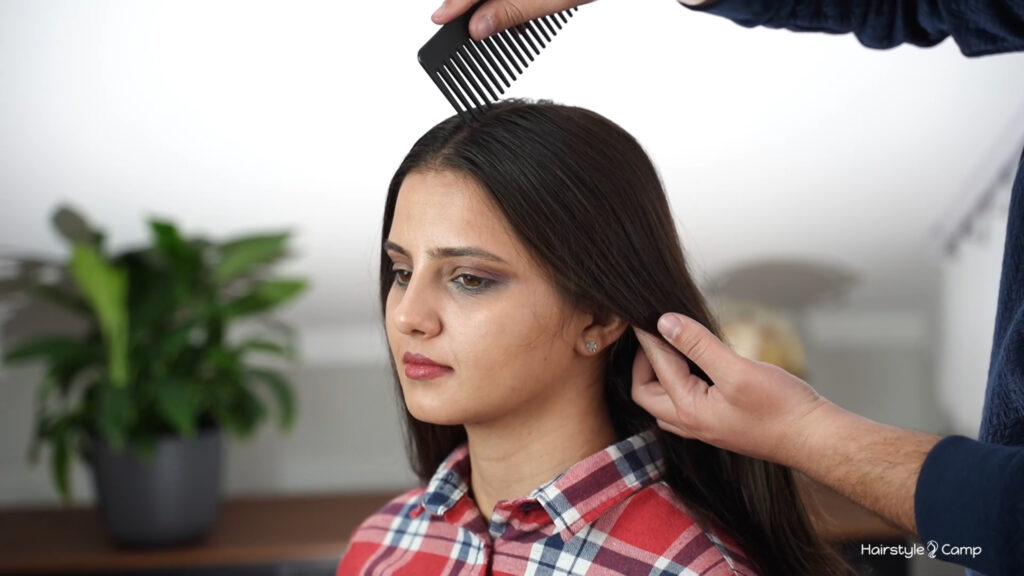
Start by brushing the hair from roots to ends so there are no tangles underneath. Then create a clean middle part from the front hairline back through the crown.
This center part becomes the guide for the whole hairstyle. If it is not straight at the start, the bubble pigtails can look uneven later, so take an extra moment to clean up the parting with the tail of the comb.
2. Separate the Front Side Section for the Lace Braid
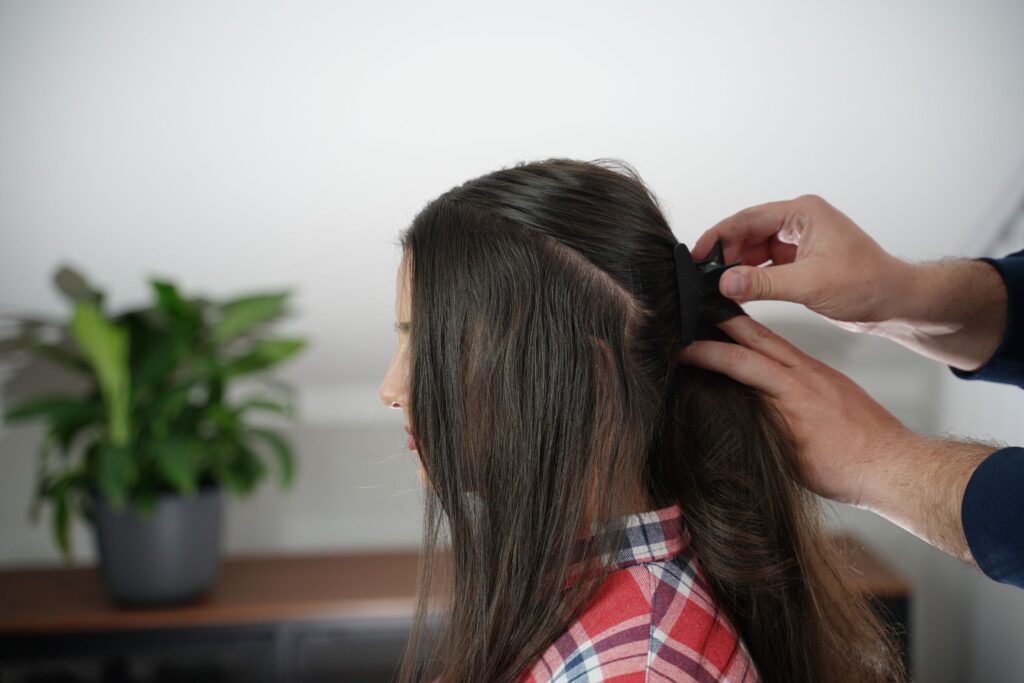
Working on one side of the head, separate a side section. This section should start near the front hairline and angle toward the area above the ear. Clip the remaining hair away so only this side section is free to braid.
Make the section wide enough for the lace braid, but not so wide that it takes too much hair from the bubble braid area. The lace braid will sit neatly along the side and add detail beside the bubble braid.
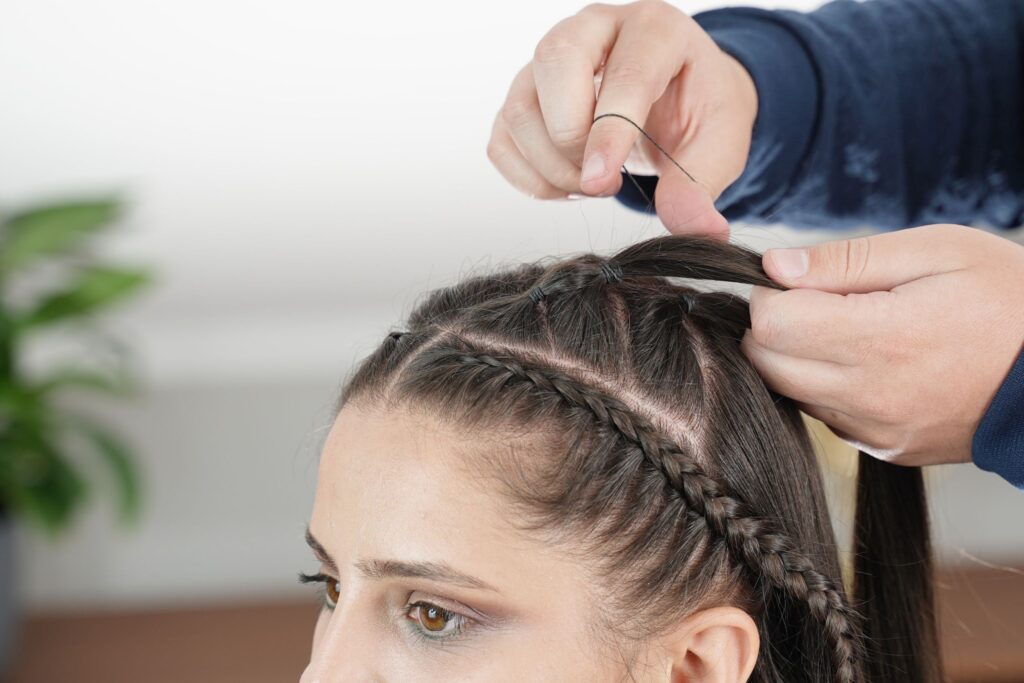
3. Start the Lace Braid
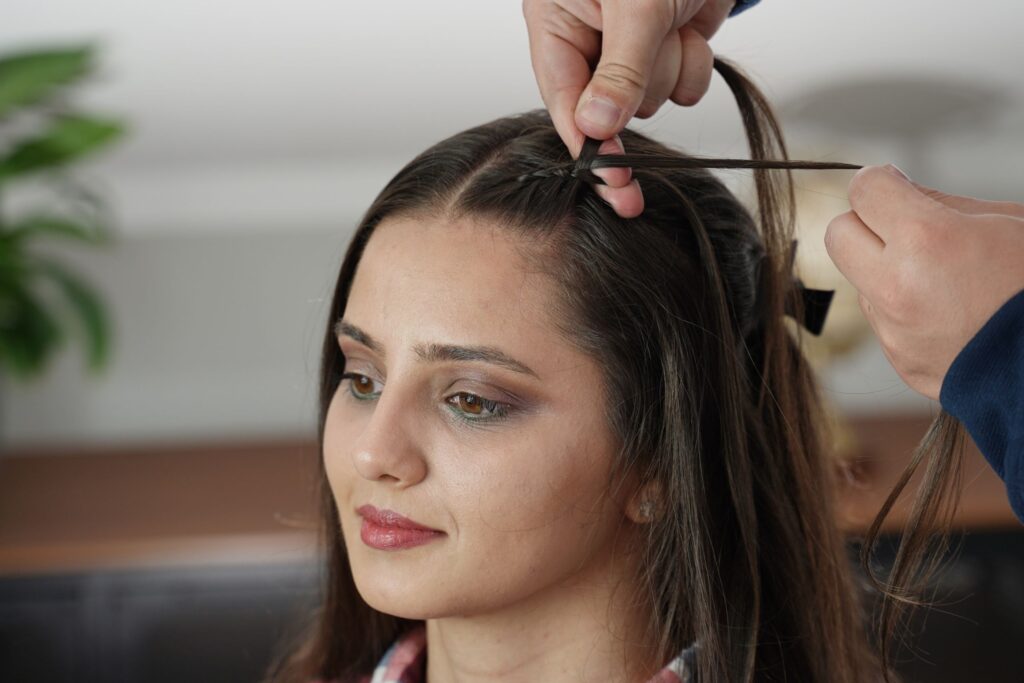
Pick up a small piece at the front of the side and divide it into three equal strands. Cross the strand closest to the face under the middle strand. Then cross the opposite outside strand under the middle.
Make the first two or three passes without adding much hair. This gives the braid a clean starting point and keeps the front from looking bulky.
Now begin adding hair, but only on the face-side strand. Each time that face-side strand is about to cross under the middle, pick up a thin slice of loose hair from the same side and add it into the strand first.
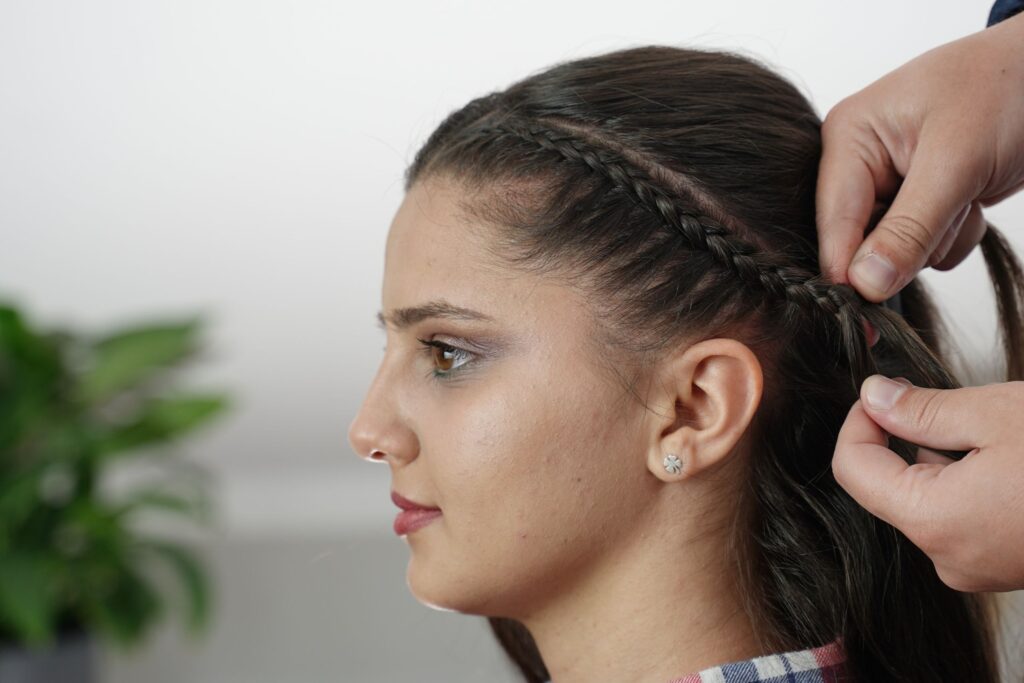
Do not add extra hair to the opposite strand. Let that strand cross under as usual. Only pick up hair from face side so the braid moves diagonally along the side of the head.
Continue following the curve of the head toward the ear. Keep the added slices small and even so the braid does not suddenly widen or pull away from the scalp.
4. Finish the Lace Braid and Repeat on the Other Side
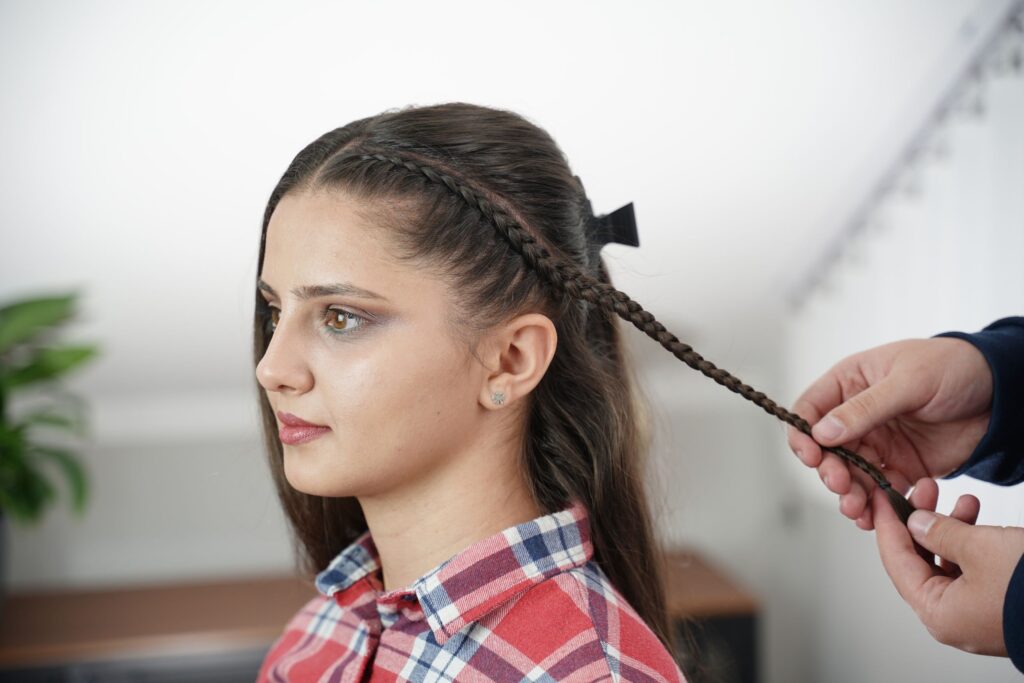
Once all the loose hair from the side section has been added into the braid, continue braiding the remaining length as a regular three-strand braid. Secure the end with a small elastic so it does not unravel while you work.
Repeat the same lace braid on the other side of the middle part. When both lace braids are done, you should have two braided borders with loose hair left on each side for the double bubble braid pigtails.
5. Create the First Bubble Braid
Choose one side to bubble braid first. Take a small front section from the loose hair between the middle part and the lace braid. Keep the section clean and straight with the tail comb, then secure it with a small elastic close to the scalp.
This first elastic becomes the anchor for the bubble braid. Smooth the hair before tightening it so the top of the section stays sleek.
Take another clean section directly behind the first one and secure it with a small elastic first. Then bring the first ponytail over this new section and fasten them together with a fresh elastic.
After each elastic is secured, pinch the hair between the two elastics and gently pull outward. Work from both sides of the section rather than yanking from one spot. The goal is a rounded bubble, not a loose loop.
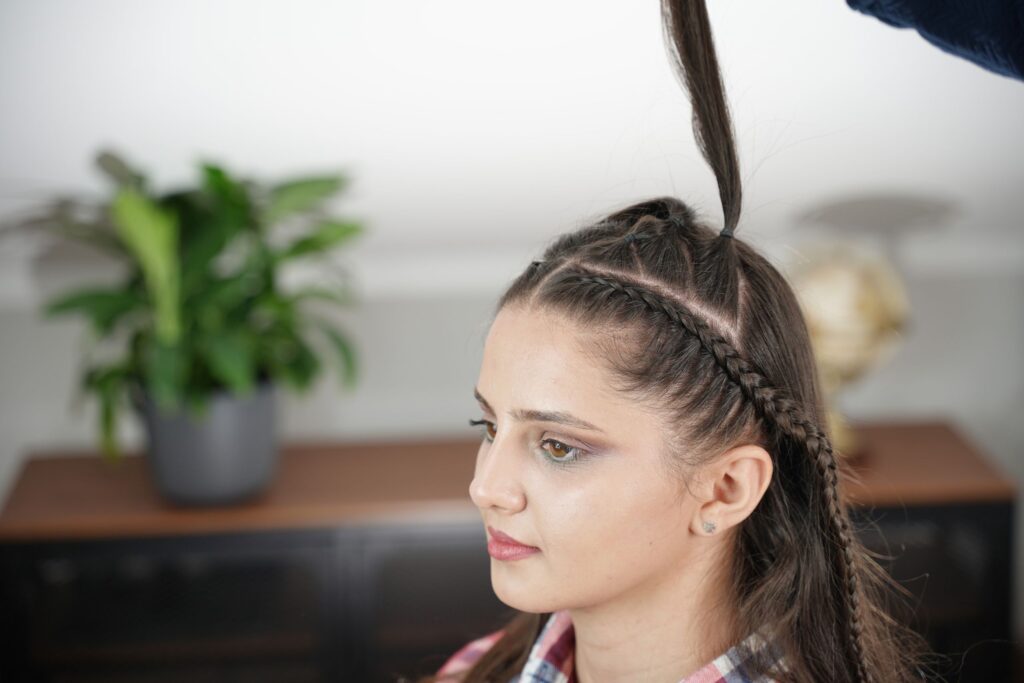
Repeat the same pattern as you work toward the back of the head: take a new section, secure it with elastic, bring the main bubble braided ponytail section over it and secure with a fresh elastic, then gently pull the section into a bubble.
Try to keep the parting line between the middle part and the lace braid clean. The clean parting is a big part of what makes this hairstyle look gorgeous.
6. Blend the Lace Braid Into the Bubble Braid
Once the main bubble braid lines up with the ear, secure the next section into a ponytail with a small elastic, just like the previous sections.
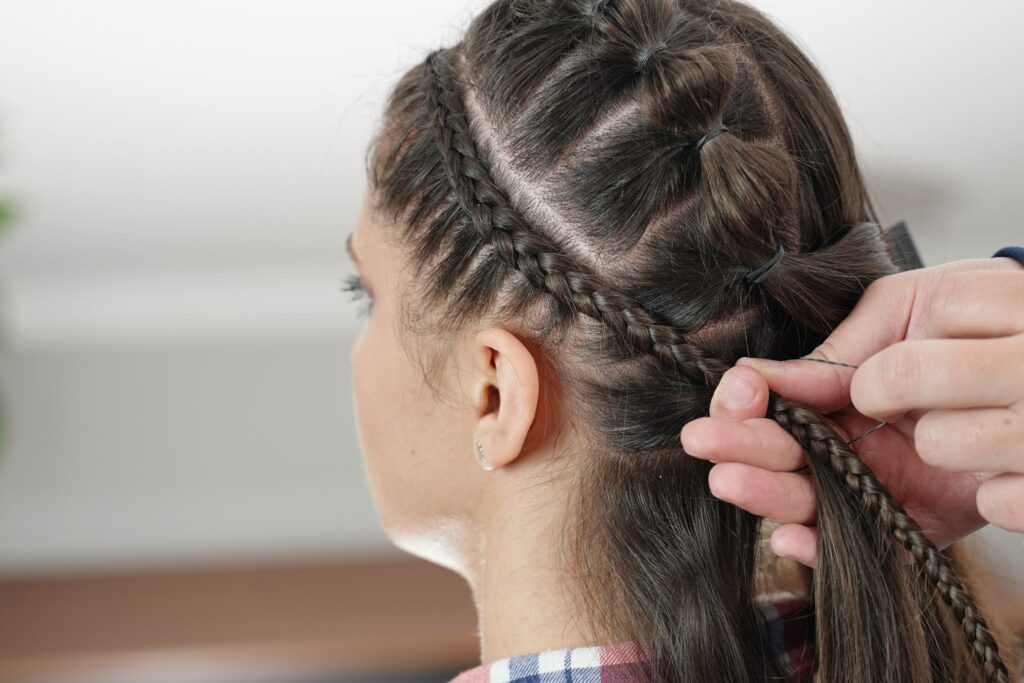
This time, place the lace braid over the new ponytail section and secure them together with an elastic.
Then unbraid only the lower part of the lace braid, stopping where it meets the ponytail section.
After that, bring the main bubble braid section down over the joined lace braid and ponytail section, then tie everything together with a fresh elastic. This blends the lace braid into the bubble braid while keeping the side braid neat and visible.
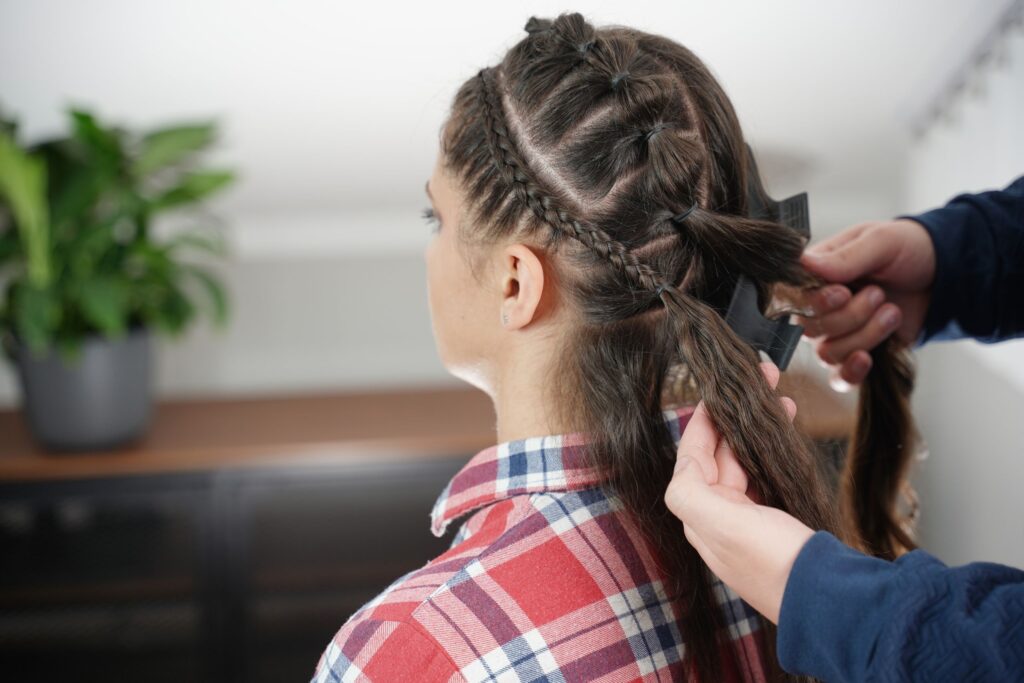
7. Continue the Bubbles Down the Tail
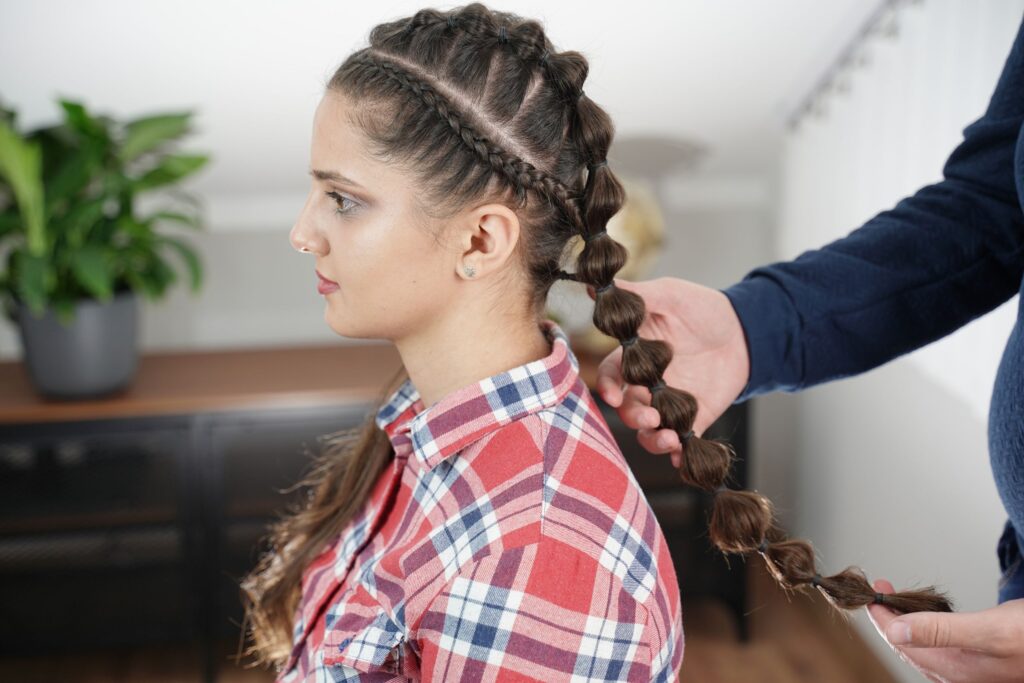
Once you have sectioned and added all the loose hair on that side, continue down the length of the ponytail. Place an elastic a short distance below the previous one, then gently pull the hair between the elastics to make the next bubble.
Keep the spacing consistent from top to bottom. If the hair gets thinner toward the ends, make the lower bubbles slightly smaller so the pigtail still looks balanced.
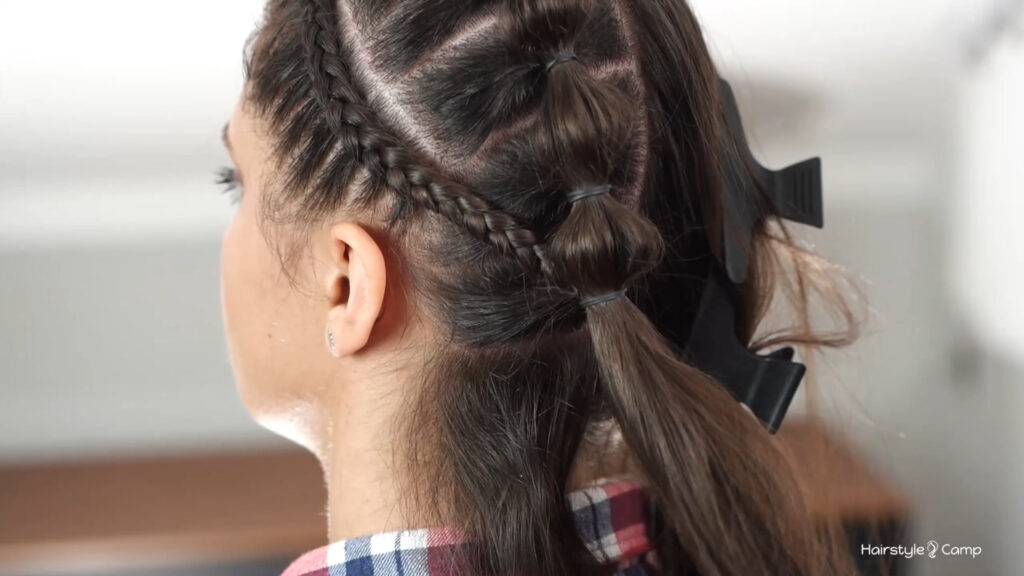
8. Repeat on the Other Side
Repeat the same steps on the other side of the head. For the neatest finish, try to place the lace braid, partings, elastics, and bubbles at the same height as the first side.
This will help both sides match and keep the hairstyle looking clean.
Final Look
The finished hairstyle has clean partings, lace braid detail, and full bubble pigtails. It feels playful, but still polished enough for a party or special event. It is a great style for long hair when you want something more creative than regular pigtails, but easier to create than two full Dutch braids.

Tips for a Neat Finish
- Use small sections for the lace braid. Smaller pickups make the braid sit flatter and cleaner along the side of the head.
- Hold the elastic while shaping each bubble. This prevents the elastic from sliding while you pull volume into the section.
- Shape each bubble before moving to the next one. It is much easier to adjust one fresh bubble than to fix the whole pigtail at the end.
- Keep tension comfortable. The hairstyle should feel secure, but not tight enough to pull at the scalp or hairline.
For this style, I like to take my time on the first side, then use it as a guide when working on the second side. Once the sectioning is in place, the technique becomes much easier: create the lace braid, place the bubble sections at the same height, connect the lace braid into the bubble braid, and gently pull each section into a soft bubble.