
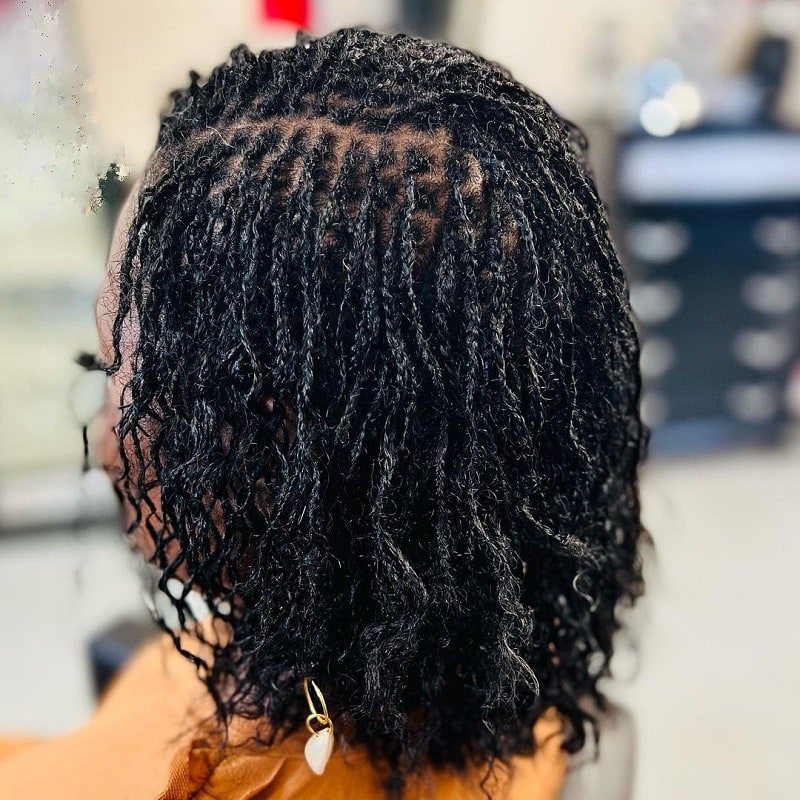
Are you looking to do dreadlocks on your hair but are afraid of the bulkiness or length? Then, Microlocs will suit your needs perfectly. They are smaller than traditional dreadlocks but still fulfill your expectations and appearance and give you fullness and volume.
Here is a complete guide that should be helpful for when you want to embark on a Microlocs journey.
What Are Microlocs?
Microlocs are tiny and versatile loc styles that often resemble braids. Because of their look, they appear like curls from a distance. They are usually 3-10 mm in diameter; their size ranges from a shoelace to that of a pencil.
Types of Microlocs
How you start your Microloc styles determines the loc type you choose. Check out these types of Microlocs.
Microlocs Started With Twists

This type starts with a twist at the base, perfect for Microlocs with larger diameters, and serves most hair textures well.
Maintaining them will require interlocking or palm rolling, which helps nurture your loc style.
Stylists opt to use the two-strand twist when starting to protect your hair and give you a good foundation. Its affordability is another reason that people prefer this type.
It gives you a good look when starting your loc journey and tends to bring out the curliness in your hair as the locs grow.
Microlocs Started With Interlocking

This interlocking method suits fine textured hair or those who want tinier locs. However, it’s labor-intensive.
Microlocs Started With Braids
Starting your Microlocs with braids is another affordable option that best fits fine hair texture that isn’t suitable for twisting. It’s a perfect choice for those with longer hair, but it takes quite a while since you’ll have to install the braids first.
Though the result may resemble having Sisterlocks, this method is much more affordable. It also gives your hair a straight finish as you continue your Microlocs journey.
Additionally, you can self-install your braids for this Microlocs style.
Pros and Cons of Microlocs
People go for Microlocs because of their hair volume and appearance. However, installing and caring for them has its benefits and disadvantages.
Pros
- It’s lighter in volume and weight even as it increases in length and size.
- It looks good from installation through every phase of the loc journey.
- You can use various loc installation and maintenance techniques.
- Easy to install as it doesn’t require formal training.
- You can also DIY, saving money.
- It’s an affordable loc technique.
- When interlocking, you’ll reduce your hair maintenance needs.
- If the strands are separate, you can combine and upgrade your Microlocs to dreadlocks.
- Loc styling versatility.
- It doesn’t require any specific tool or material for installation techniques like braids and twists.
Cons
- There isn’t a definite Microloc pattern or parting resulting in an asymmetrical head of locs.
- Without proper techniques, your hair can become delicate and susceptible to breakage.
- It can be challenging to style as they continue to grow in size and volume.
- Fragile to maintain if you get minute locs.
- Expensive and time-consuming to keep since you’ll have approximately 200 to 300 locs.
How Do You Install Microlocs?
Microlocs don’t require any unique expertise or training before their installation. Instead, it’s a simple process that involves keenness, research, and care for the perfect result.
Here are the steps in Microloc installation.
Research
Research the Microloc installation techniques before deciding which type will suit your hair. Consider your hair texture and expectations. Fine-textured hair demands interlocking or braiding, while twisting works best on coarser textures.
Remember, some methods may require specific tools to complete the installation successfully. Your choice of technique determines if you’ll need any particular devices, like an interlocking tool or braiding crochets.
Consult with Locticians and other stylists on your expectations per your chosen technique.
Prepare Your Hair

Start your installation by shampooing your hair thoroughly. Opinions differ on deep conditioning right before installation: many locticians skip conditioner because it softens the hair, making new locs easy to slip after installation.
Instead, look into the hair products you should use to boost your Microloc installation and locking process.
Choose Your Grid and Pattern
Your hair partings determine your grid and styling options. Consider using symmetrical partings to boost neatness in your Microlocs and increase your styling options.
Consider Your Microlocs Size
When choosing your partings, establish your loc’s size. Smaller Microlocs may fall off and require more maintenance because of their fragility.
Also, they tend to increase in size as they continue to grow, which affects your starting size decision.
Section Your Hair
Once you’ve made these decisions, start your installation per each Microloc type. Section or part your hair into the required size before you begin the installation process. Use your grid or pattern expectation to get your partitions right.
Create Your Locs
Work on the two-strand twists or braids as you groom your Microlocs towards the end.
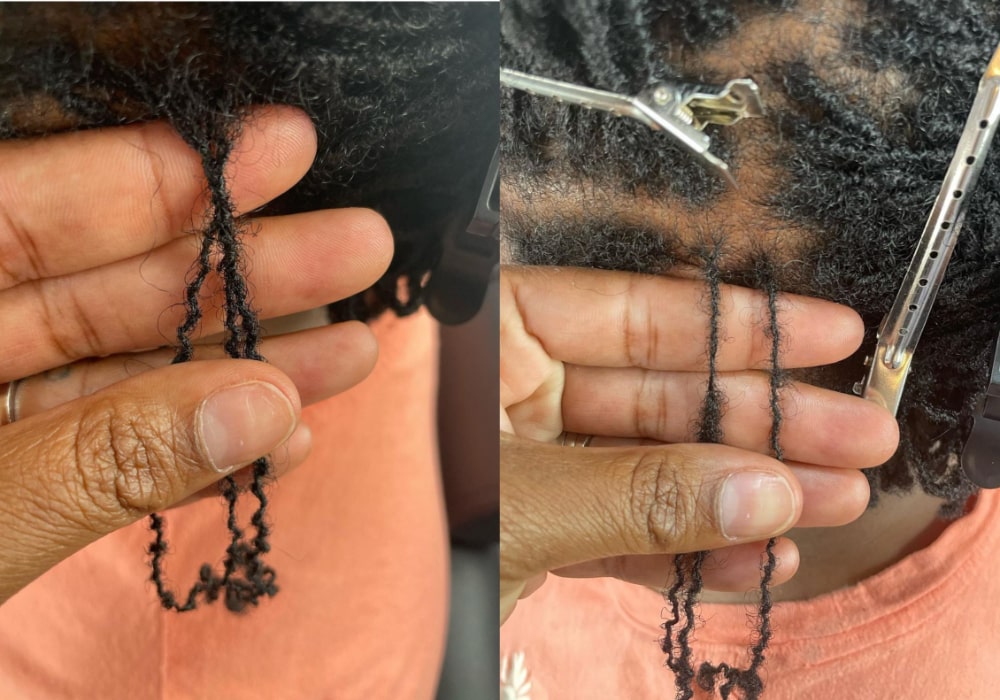
Interlocking requires an interlocking tool that you weave from north to south, east to west to create a 4-point rotation to create the Microlocs.
Doing the Microlocs interlocking or two-strand twist with the Nu Loxx tool eases the process and makes it neater. Remember to finish your installation by styling your Microlocs.
Watch The Following Tutorial to Learn the DIY Process of Microlocs
How to Maintain Microlocs?
When installing your Microlocs, think about maintenance techniques. Be keen on your rotation direction and interlocking pattern as you have to mirror these methods during maintenance.
It’s also necessary to inquire about or research the washing or conditioning of your Microlocs to keep them fresh between your retightening sessions.
Microlocs require retightening every 6-8 weeks. After that, you can use interlocking or rolling techniques to revamp your look. Proper care and maintenance increase their longevity and protect your hair better.
Dos and Don’ts While Getting Microlocs
Microlocs installation and maintenance demand proper use of their techniques to maintain your appearance. Here are some dos and don’ts that you must consider when thinking about these locs:
- Wash your hair regularly and carefully.
- Be keen on your installation and maintenance techniques to avoid slip-ups.
- Choose your size diligently.
- Retighten your locs regularly to maintain their shape and appearance. Overtightening can damage your hair or locs. Your timing when retightening differentiates its results.
- Use appropriate interlocking techniques to avoid holes or creating tension in your hair.
- Don’t use thick moisturizing creams in your Microlocs, as they don’t come out quickly.
- Don’t bleach your Microlocs.
- Use appropriate styling methods to avoid tension or unraveling of your tiny locs.
- Don’t comb your starter locs.
- Don’t retighten your locs while they are soaking wet.
Microlocs Hairstyles for Men and Women
Tribal Vibes

A similar look has long been worn by the Hamar tribe of Ethiopia, where the people use butter and red clay to achieve the characteristic hue. The traditional look can be recreated by chopping the tight coils short at the front and sides while keeping the back at shoulder-length, much like a mullet haircut.
Half-Up + Temple Fade

Make a style statement by tightly twisting the strands producing thin dreads and pinning the front ones at the back, creating a classic half-up hairstyle. Couple the look with a temple fade, chin strap beard, and get ready to rock the world!
Curly Locs

Bored of your plain straight locs? Spice them up by dyeing some strands brown for a two-toned appeal and cut them into a shoulder-length bob. Don’t leave the dreads straight, rather curl them overnight using Flexi rods and you won’t regret the results.
Short Twist

The shorter, the better! Grow out those kinky afro curls a few inches before twisting, braiding, or coiling them, producing tiny locs that are sure to grab the attention of many. Carve out a hard part and finish off the look with a rugged beard.
Shine with Silver Locs

Black ladies getting on in years can save themselves from the hassle of styling their hair daily by opting for microlocs. Instead of hiding those greys, turn your entire mane silvery grey using appropriate extensions and finish off by subtly layering the strands to avoid a blunt look. Eye-catching, right?
Highlighted Tips

Here is a simple idea for men who want to turn their dreads into a one-of-a-kind hairstyle. Cut the strands at varying lengths and dye the tips blonde for a highlighted appeal. Don’t fret about the emerging roots as they add up to the look. Stylish, without a doubt!
Microlocs vs. Sisterlocks

Sisterlocks are different than microlocs, and you can clearly see that in the photo above. Microlocs are smaller forms of traditional locs where you don’t need any training or certification to complete their installation.
Installing Sisterlocks requires a certified Sisterlock consultant. They are small locks that use a specific technique invented by Dr. JoAnne Cornwell in 1993.
Sisterlocks experts twist the hair from the tip to the roots exerting tension at the hair roots. They don’t require any wax or product to enhance the hair grip. However, due to the specificity of this technique, installing Sisterlocks is expensive and time-consuming.
Sisterlocks are also smaller and require regular maintenance from a certified expert to keep them healthy.
How To Remove Microlocs
You use a rattail comb to remove Microlocs. These tiny locs aren’t permanent, but it takes time to comb over the Microlocs to remove them altogether.
First, you need to soak and wash your hair. Then use the rattail comb or a fine-toothed comb to remove the locs slowly. Next, start unraveling from the back slowly until you finish.
Microlocs are an innovative and affordable option for your hair. You only need to understand the installation and maintenance requirements and processes. It’s a simple process that doesn’t require training and fits anyone who’d like to install it.